Hitachi DV-PF2U Owners Guide - Page 17
Dvd/vcr To Tv Connection, Setting The Ch3/ch4, Switch - manual for
 |
View all Hitachi DV-PF2U manuals
Add to My Manuals
Save this manual to your list of manuals |
Page 17 highlights
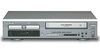
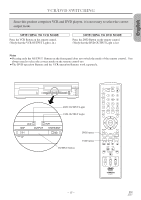
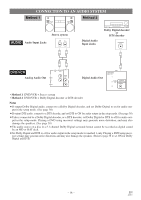
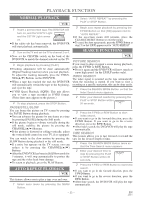
English The following show examples of connections commonly used to connect the DVD/VCR to TV and other components. Notes ¡Be sure to turn off the power to all components in the system before connecting another component. ¡Refer to the Instruction Manuals for your TV, stereo system and any other components to be connected to the DVD/VCR. DVD/VCR TO TV CONNECTION SETTING THE CH3/CH4 SWITCH 1. Disconnect the AC power cord of the TV from the AC outlet. 2. Disconnect the antenna or cable from the TV. 3. Connect the antenna or cable to the ANT-IN jack of the DVD/VCR. 4. Connect the DVD/VCR to the TV using the coaxial cable. 5. Plug the AC power cords of the DVD/VCR and TV into the AC outlets. [VHF/UHF [Indoor antenna] combination antenna] OR [Cable box or satellite box] OR From Cable or Satellite Company IN OUT [Back of the DVD Player] [Back of the UHF/VHF combination TV] Coaxial cable ANT - IN (supplied) ANT - OUT 3CH 4CH UHF/VHF If your TV does not have A/V terminals: When the DVD/VCR is in the VCR Playback mode or when the DVD/VCR is in the VCR mode, your TV will receive signals from the DVD/VCR on either channel 3 or channel 4. To use the DVD/VCR with your TV, set the selector switch to CH3 or CH4 (which is located in the back of your DVD/VCR), whichever is not used for normal broadcasts in your area. Then set your TV to the same channel. CH3 CH4 ANT - IN ANT - OUT CH3 CH4 [Back of the DVD Player] Note to CATV system installer This reminder is provided to call the CATV system installer's attention to Article 820-40 of the NEC that provides guidelines for proper grounding and, in particular, specifies that the cable ground should be connected to the grounding system of the building, as close to the point of cable entry as practical. - 17 - EN 2C15
-
 1
1 -
2
-
3
-
4
-
5
-
6
-
7
-
8
-
9
-
10
-
11
-
 12
12 -
 13
13 -
 14
14 -
 15
15 -
 16
16 -
 17
17 -
 18
18 -
 19
19 -
 20
20 -
 21
21 -
 22
22 -
23
-
24
-
25
-
26
-
27
-
28
-
29
-
30
-
31
-
32
-
33
-
34
-
35
-
36
-
37
-
38
-
39
-
40
-
41
-
42
-
43
-
44
-
45
-
46
-
47
-
48
-
49
-
50
-
51
-
52
-
53
-
54
-
55
-
56
-
57
-
58
-
59
-
60
-
61
-
62
-
63
-
64
-
65
-
66
-
67
-
68
-
69
-
70
-
71
-
72
-
73
-
74
-
75
-
76
-
77
-
78
-
79
-
80
-
81
-
82
-
83
-
84
-
85
-
86
-
87
-
88
-
89
-
90
-
91
-
92
-
93
-
94
-
95
-
96
-
97
-
98
-
99
-
100
-
101
-
102
-
103
-
104
-
105
-
106
-
107
-
108
-
109
-
110
-
111
-
112
-
113
-
114
-
115
-
116
-
117
-
118
-
119
-
120
-
121
-
122
-
123
-
124
-
125
-
126
-
127
-
128
-
129
-
130
-
131
-
132
-
133
-
134
-
135
-
136
-
137
-
138
-
139
-
140
 |
 |