Hitachi DV-PF2U Owners Guide - Page 9
Operating Controls And Functions - remote
 |
View all Hitachi DV-PF2U manuals
Add to My Manuals
Save this manual to your list of manuals |
Page 9 highlights
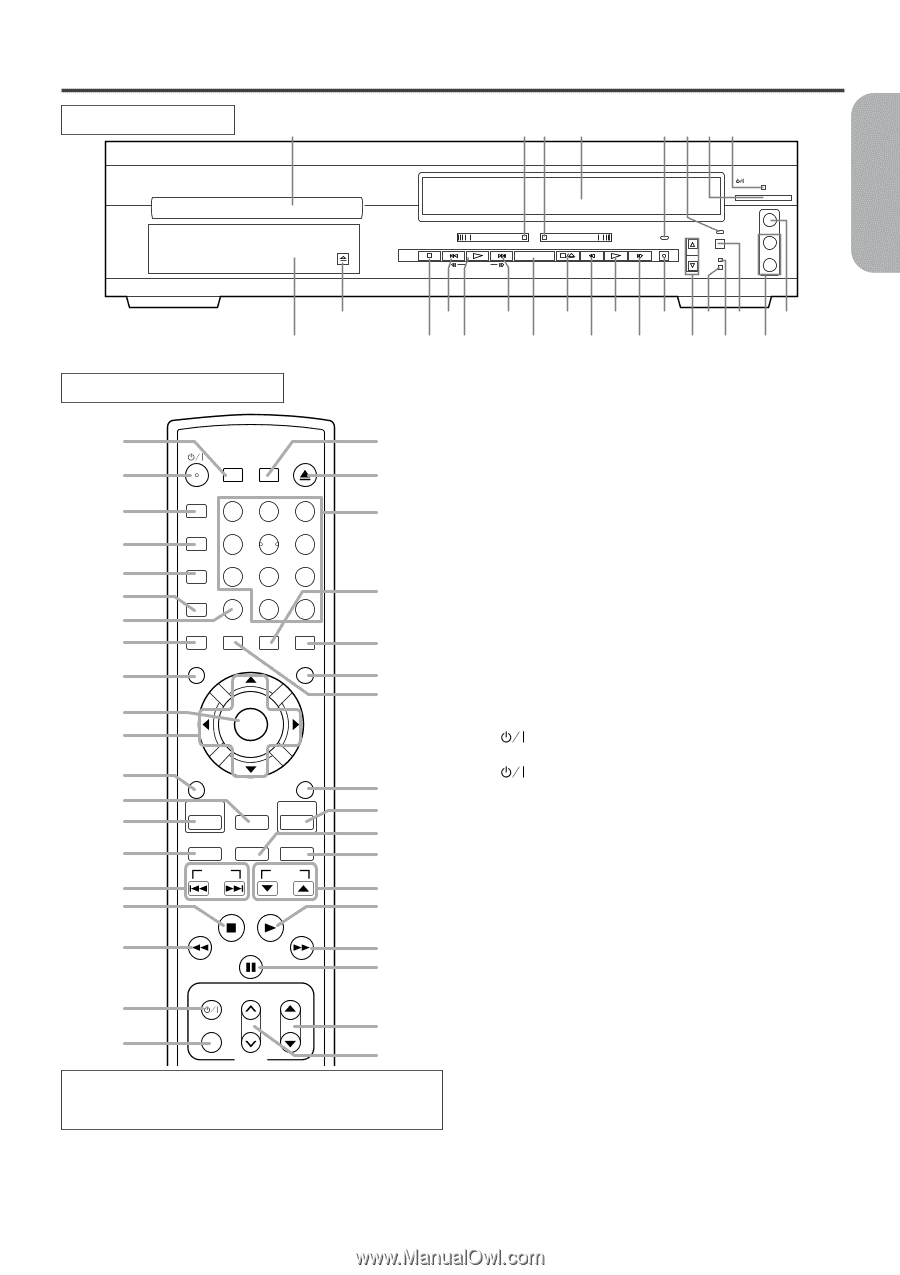
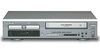
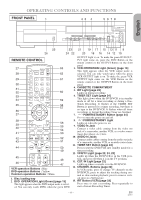
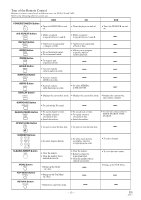
OPERATING CONTROLS AND FUNCTIONS FRONT PANEL 1 23 4 5 678 English OPEN/ CLOSE POWER/STANDBY VIDEO IN DVD VCR CHANNEL TIMER SET L STOP SKIP PLAY SKIP OUTPUT STOP/EJECT REW PLAY F.FWD IRT (mono) SEARCH VCR/TV CST.IN R AUDIO IN 25 23 21 19 17 15 13 11 9 26 24 22 20 18 16 14 12 10 REMOTE CONTROL 27 SEARCH OPEN SURROUND MODE CLOSE 63 28 62 A-B REPEAT 29 123 61 REPEAT 30 456 MODE 31 789 32 ZOOM CLEAR/ C. RESET +100 60 33 0 +10 ANGLE SUBTITLE AUDIO DISPLAY 34 59 MENU 35 TOP MENU 58 57 36 ENTER 37 38 RETURN SETUP 56 39 DVD VCR/TV VCR 40 55 SLOW SPEED REC 54 41 53 SKIP CH 42 52 43 STOP PLAY 51 44 PAUSE/STEP 50 49 TV POWER VOL CH 45 VIDEO/TV 48 46 TV 47 VCR operation Buttons : Blue DVD operation Buttons : Yellow Common operation Buttons : White 1. Disc loading tray 2. DVD OPERATION Light (Green) [page 15] This light appears when the DVD output mode is selected. You can only watch DVDs when the green DVD OUTPUT Light is on. To make the green DVD OUT- PUT light come on, press the DVD Button on the remote control or the OUTPUT Button on the front panel. 3. VCR OPERATION Light (Green) [page 15] This light appears when the VCR output mode is selected. You can only watch tapes when the green VCR OUTPUT light is on. To make the green VCR OUTPUT light come on, the VCR Button on the remote control or the OUTPUT Button on the front panel. 4. CASSETTE COMPARTMENT 5. IRT Light [page 23] Lights up during recording. 6. TIMER SET Light [page 24] This light glows when the DVD/VCR is in standby mode or off for a timer recording or during a One- Touch Recording. It flashes if the TIMER SET Button is pressed for a timer recording, but there is no tape in the DVD/VCR. It flashes when all timer recordings or Instant Recording Timer are finished. 7. POWER/STANDBY Button [page 24] Press to turn the power on and off. 8. POWER/STANDBY Light Lights up when the power is on. 9. VIDEO In Jack Connect a video cable coming from the video out jack of a camcorder, another VCR, or a video source (laser disc player, etc.) here. 10. AUDIO In Jacks Connect audio cables coming from the audio out jacks of a camcorder, another VCR, or an audio source here. 11. TIMER SET Button [page 24] Press to put the DVD/VCR into standby mode for a timer recording. 12. VCR/TV Light [page 22, 24, 25] Lights up when the DVD/VCR is in the VCR posi- tion, and goes off when it is in the TV position. 13. CST. IN Light [page 22] Lights up when a cassette is in the DVD/VCR. 14. CHANNEL Buttons [page 20] In VCR mode, press to change TV channels on the DVD/VCR; press to adjust the tracking during nor- mal or slow motion playback; press to remove verti- cal jitter in a Still picture. 15. IRT Button (VCR) [page 23] Press once to start a recording. Press repeatedly to start a Instant Recording Timer. -9- EN 2C15
-
 1
1 -
2
-
3
-
 4
4 -
 5
5 -
 6
6 -
 7
7 -
 8
8 -
 9
9 -
 10
10 -
 11
11 -
 12
12 -
 13
13 -
 14
14 -
15
-
16
-
17
-
18
-
19
-
20
-
21
-
22
-
23
-
24
-
25
-
26
-
27
-
28
-
29
-
30
-
31
-
32
-
33
-
34
-
35
-
36
-
37
-
38
-
39
-
40
-
41
-
42
-
43
-
44
-
45
-
46
-
47
-
48
-
49
-
50
-
51
-
52
-
53
-
54
-
55
-
56
-
57
-
58
-
59
-
60
-
61
-
62
-
63
-
64
-
65
-
66
-
67
-
68
-
69
-
70
-
71
-
72
-
73
-
74
-
75
-
76
-
77
-
78
-
79
-
80
-
81
-
82
-
83
-
84
-
85
-
86
-
87
-
88
-
89
-
90
-
91
-
92
-
93
-
94
-
95
-
96
-
97
-
98
-
99
-
100
-
101
-
102
-
103
-
104
-
105
-
106
-
107
-
108
-
109
-
110
-
111
-
112
-
113
-
114
-
115
-
116
-
117
-
118
-
119
-
120
-
121
-
122
-
123
-
124
-
125
-
126
-
127
-
128
-
129
-
130
-
131
-
132
-
133
-
134
-
135
-
136
-
137
-
138
-
139
-
140
 |
 |