Hitachi DZ-MV100A Owners Guide - Page 143
Recording Image From Other Camcorder, or AV Device, Press the MENU button to return to
 |
View all Hitachi DZ-MV100A manuals
Add to My Manuals
Save this manual to your list of manuals |
Page 143 highlights
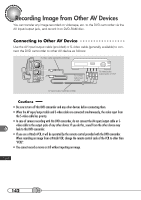
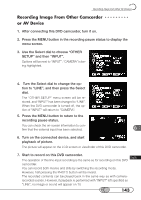
Recording Image from Other AV Devices R○ e○ c○o○rd○ i○n○g○ I○m○ a○ g○ e○ ○F○ro○ m○ ○ O○ t○h○e○r○C○a○m○ c○ o○ r○d○e○r or AV Device 1. After connecting this DVD camcorder, turn it on. 2. Press the MENU button in the recording pause status to display the menu screen. 3. Use the Select dial to choose "OTHER SETUP" and then "INPUT". Options will be next to "INPUT": "CAMERA" is being highlighted. 4. Turn the Select dial to change the option to "LINE", and then press the Select dial. The "OTHER SETUP" menu screen will be restored, and "INPUT" has been changed to "LINE". When the DVD camcorder is turned off, the option of "INPUT" will return to "CAMERA". 5. Press the MENU button to return to the recording pause status. You can check the on-screen information to confirm that the external input has been selected. 6. Turn on the connected device, and start playback of picture. The picture will appear on the LCD screen or viewfinder of this DVD camcorder. 7. Start to record on this DVD camcorder. The operation of this line-input recording is the same as for recording on this DVD camcorder. You can record both movies and stills by switching the recording mode. However, half pressing the PHOTO button will be invalid. The recorded contents can be played back in the same way as with camerarecorded scenes. However, if playback is performed with "INPUT" left specified as "LINE", no image or sound will appear on TV. 143
-
 1
1 -
2
-
3
-
4
-
5
-
6
-
7
-
8
-
9
-
10
-
11
-
12
-
13
-
14
-
15
-
16
-
17
-
18
-
19
-
20
-
21
-
22
-
23
-
24
-
25
-
26
-
27
-
28
-
29
-
30
-
31
-
32
-
33
-
34
-
35
-
36
-
37
-
38
-
39
-
40
-
41
-
42
-
43
-
44
-
45
-
46
-
47
-
48
-
49
-
50
-
51
-
52
-
53
-
54
-
55
-
56
-
57
-
58
-
59
-
60
-
61
-
62
-
63
-
64
-
65
-
66
-
67
-
68
-
69
-
70
-
71
-
72
-
73
-
74
-
75
-
76
-
77
-
78
-
79
-
80
-
81
-
82
-
83
-
84
-
85
-
86
-
87
-
88
-
89
-
90
-
91
-
92
-
93
-
94
-
95
-
96
-
97
-
98
-
99
-
100
-
101
-
102
-
103
-
104
-
105
-
106
-
107
-
108
-
109
-
110
-
111
-
112
-
113
-
114
-
115
-
116
-
117
-
118
-
119
-
120
-
121
-
122
-
123
-
124
-
125
-
126
-
127
-
128
-
129
-
130
-
131
-
132
-
133
-
134
-
135
-
136
-
137
-
 138
138 -
 139
139 -
 140
140 -
 141
141 -
 142
142 -
 143
143 -
 144
144 -
 145
145 -
 146
146 -
 147
147 -
 148
148 -
149
-
150
-
151
-
152
-
153
-
154
-
155
-
156
-
157
-
158
-
159
-
160
-
161
-
162
-
163
-
164
-
165
-
166
-
167
-
168
-
169
-
170
 |
 |
