Honeywell CT8775A Owner's Manual - Page 5
step 5. Separate Wallplate from Thermostat - thermostat c
 |
UPC - 085267244138
View all Honeywell CT8775A manuals
Add to My Manuals
Save this manual to your list of manuals |
Page 5 highlights
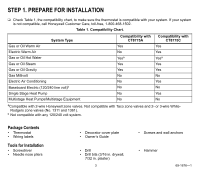
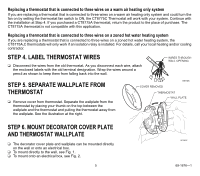
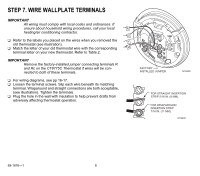
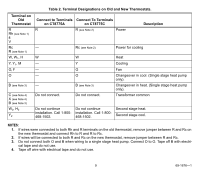
Replacing a thermostat that is connected to three wires on a warm air heating only system If you are replacing a thermostat that is connected to three wires on a warm air heating only system and could turn the fan on by setting the thermostat fan switch to ON, the CT8775C Thermostat will work with your system. Continue with the installation at Step 4. If you purchased a CT8775A thermostat, return the product to the place of purchase. The CT8775A thermostat is not compatible with this application. Replacing a thermostat that is connected to three wires on a zoned hot water heating system If you are replacing a thermostat that is connected to three wires on a zoned hot water heating system, the CT8775A,C thermostats will only work if an isolation relay is installed. For details, call your local heating and/or cooling contractor. STEP 4. LABEL THERMOSTAT WIRES ❑ Disconnect the wires from the old thermostat. As you disconnect each wire, attach the enclosed labels with the old terminal designation. Wrap the wires around a pencil as shown to keep them from falling back into the wall. WIRES THROUGH WALL OPENING STEP 5. SEPARATE WALLPLATE FROM THERMOSTAT ❑ Remove cover from thermostat. Separate the wallplate from the thermostat by placing your thumb on the top between the wallplate and the thermostat and pulling the thermostat away from the wallplate. See the illustration at the right. M5136 COVER REMOVED THERMOSTAT WALL PLATE STEP 6. MOUNT DECORATOR COVER PLATE AND THERMOSTAT WALLPLATE ❑ The decorator cover plate and wallplate can be mounted directly on the wall or onto an electrical box. ❑ To mount directly to the wall, see Fig. 1. ❑ To mount onto an electrical box, see Fig. 2. 5 M19492 69-1676-1
-
 1
1 -
 2
2 -
 3
3 -
 4
4 -
 5
5 -
 6
6 -
 7
7 -
 8
8 -
 9
9 -
 10
10 -
 11
11 -
12
-
13
-
14
-
15
-
16
-
17
-
18
-
19
-
20
 |
 |
