Honeywell WAVE2EX Setup Guide - Page 16
Mechanics of Programming
 |
UPC - 781410215504
View all Honeywell WAVE2EX manuals
Add to My Manuals
Save this manual to your list of manuals |
Page 16 highlights
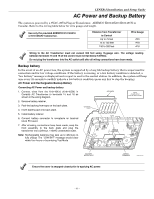
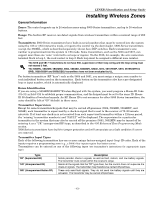
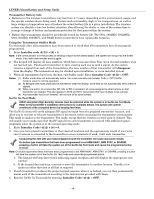
LYNXR-I Installation and Setup Guide Mechanics of Programming General Programming Information Programming options are stored in non-removable, electrically erasable, nonvolatile EEROM memory. The system can be programmed at any time, even at the installer's premises prior to the actual installation. Simply apply power temporarily to the Control and then program the unit as desired. There are four programming modes: • Data field programming (used for setting various system options). • Interactive menu mode programming (used for programming zone information, programming Powerline Carrier Devices, and for entering transmitter serial numbers). • Voice Prompt programming (used for setting various system options). • Pass-Thru programming (used for programming connected LRR/IP Communications Device). The system can also be programmed remotely, using an IBM Personal Computer, a modem, and Compass Downloader for Windows. See the Remote Programming/Control (Downloading) section. Note: You may find it convenient to adjust the volume setting before entering the Program Mode. This will allow you to clearly hear the feedback announcements or system beeps in the Programming Mode, of the system's built-in speaker. To adjust the volume, press FUNCTION + VOLUME+ [3] or [6]. Upon exiting the Program Mode, the system will reset the volume to the default value (mid level). Entering Program Mode Use one of the following methods to enter Programming Mode: 1. Press both the [✻] and [#] keys at the same time, within 50 seconds after power is applied to the Control or from exiting Programming mode, OR 2. After power-up, enter the Installer Code (4112) + 800 to enter Expert Programming mode (This method disabled if Program mode is exited using ✻98). OR enter Installer Code (4112) + 888 to enter Voice Prompt Programming mode. If a different Installer Code has been programmed, use that code to enter the Programming mode. 3. Upon entering programming mode, the control will display "--" for up to two seconds indicating it is communicating with the LRR/IP devices. 4. Once you have entered the Program mode, data field "20" (the first data field in the system) will be displayed and both keypad LEDs will flash. If you have entered the Voice Prompt Programming mode. "Pro" will be displayed. Programming a Data Field 1. Press [✻] + Field No. (for example, ✻21), followed by the required entry. 2. When you have completely programmed a data field, the keypad will "beep" three times and then automatically display the next data field in sequence. To go to a different field, press [✻] plus the desired field number. 3. If the number of digits that will be entered in a data field is less than the maximum number of digits available (e.g. phone number field), enter the desired data, then press [✻] to advance to the next data field. 4. If a nonexistent field has been entered, the keypad will display "EE". Simply re-enter [✻] plus a valid field number. To view a data field without making changes: Enter [#] + Field No. Data will be displayed for that field. To delete an entry in a field: Enter [✻] + Field No. + [✻]. (Applies only to fields ✻40-✻44, ✻88 and ✻94). - 16 -
-
 1
1 -
2
-
3
-
4
-
5
-
6
-
7
-
8
-
9
-
10
-
 11
11 -
 12
12 -
 13
13 -
 14
14 -
 15
15 -
 16
16 -
 17
17 -
 18
18 -
 19
19 -
 20
20 -
 21
21 -
22
-
23
-
24
-
25
-
26
-
27
-
28
-
29
-
30
-
31
-
32
-
33
-
34
-
35
-
36
-
37
-
38
-
39
-
40
-
41
-
42
-
43
-
44
-
45
-
46
-
47
-
48
-
49
-
50
-
51
-
52
-
53
-
54
-
55
-
56
-
57
-
58
-
59
-
60
-
61
-
62
-
63
-
64
-
65
-
66
-
67
-
68
-
69
-
70
-
71
-
72
 |
 |