Honeywell WAVE2EX Setup Guide - Page 30
While in Program mode, press, to enter Zone Programming Menu Mode.
 |
UPC - 781410215504
View all Honeywell WAVE2EX manuals
Add to My Manuals
Save this manual to your list of manuals |
Page 30 highlights
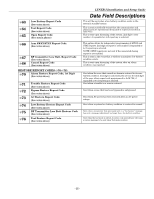
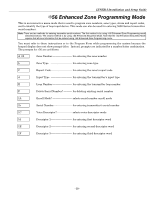
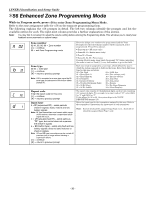
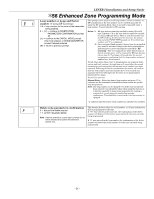
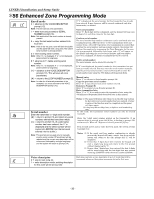
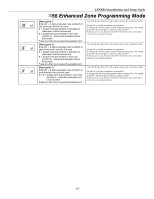
LYNXR-I Installation and Setup Guide ✻56 Enhanced Zone Programming Mode While in Program mode, press ✻56 to enter Zone Programming Menu Mode. Refer to the zone assignment table for ✻56 on the separate programming form. The following explains the ✻56 prompts in detail. The left two columns identify the prompts and list the available entries for each. The right-most column provides a further explanation of the entries. Note: You may find it convenient to adjust the volume setting before entering the Programming Mode. This will allow you to clearly hear feedback announcements or system beeps. A 02 b zt C rc d i Zone number 02-41, 95, 96, 99 = Zone number [✻] = continue 00 = exit Zone Programming mode Zone type 00-24 = zone type [✻] = continue [#] = return to previous prompt Note: If 00 is accepted as a zone type, save the 00 zone type and advance to the confirm delete prompt (F). Report code Enter the report code for this zone. [✻] = continue [#] = return to previous prompt Input type 3 =RF (supervised RF) - sends periodic check-in signals, faults, restore and low battery signals Note: RF type transmitters must remain within range of the receiver, otherwise a supervision failure signal will occur. 4 = UR (unsupervised RF) - sends same as "RF" type, but control does not supervise the check-in signals 5 = BR (button type) - sends only fault and low battery signals; does not send restores or check-in signals Note UR and BR type transmitters may be carried off premises (out of range without causing a supervision failure. [✻] = continue [#] = return to previous prompt Enter the 2-digit zone number to be programmed and the Voice Descriptor for the selected zone number will be announced, if it is programmed. Press [✻] to advance. • Zones 02-25 = RF zones (only) • Zones 26-41 = Button zones (only) • Zone 92 = Duress • Zones 95, 96, 99 = Panic zones Pressing 00 exits mode, upon which the prompt "56" blinks, indicating the mode is inactive. Press [✻] + any field number to go to that field. Each zone must be assigned to a zone type, which defines the way in which the system responds to faults in that zone. Enter the 2-digit zone type for this zone as follows: 00 = Not Used 08 = 24 Hr Aux 01 = Entry/Exit #1 09 = Fire without verify 02 = Entry/Exit #2 10 = Interior w/Delay 03 = Perimeter 20 = Arm-Stay 04 = Interior Follower 21 = Arm-Away 05 = Trouble Day/Alarm Night 22 = Disarm 06 = 24 Hr Silent 23 = No Alarm Response 07 = 24 Hr Audible 24 = Silent Burglary The report code consists of 2 hexadecimal digits, each in turn consisting of 2 numerical digits. For example, for a report code of "3C", enter [0][3] for "3" and [1][2] for "C". If this isZone 95, 96 or 99, the system skips to the VOICE DESCRIPTOR prompt (1C). Enter the input type for the transmitter assigned to this zone. Refer to the transmitter's instructions for input types of each transmitter. Note: Zones 2-25 should be assigned Input Type 3 or 4 . Zones 26-41 should be assigned Input Type 5 only. - 30 -
-
 1
1 -
2
-
3
-
4
-
5
-
6
-
7
-
8
-
9
-
10
-
11
-
12
-
13
-
14
-
15
-
16
-
17
-
18
-
19
-
20
-
21
-
22
-
23
-
24
-
 25
25 -
 26
26 -
 27
27 -
 28
28 -
 29
29 -
 30
30 -
 31
31 -
 32
32 -
 33
33 -
 34
34 -
 35
35 -
36
-
37
-
38
-
39
-
40
-
41
-
42
-
43
-
44
-
45
-
46
-
47
-
48
-
49
-
50
-
51
-
52
-
53
-
54
-
55
-
56
-
57
-
58
-
59
-
60
-
61
-
62
-
63
-
64
-
65
-
66
-
67
-
68
-
69
-
70
-
71
-
72
 |
 |