Hoover U6485100 Manual - Page 12
Check Brushroll Channels, Headlight - windtunnel parts
 |
View all Hoover U6485100 manuals
Add to My Manuals
Save this manual to your list of manuals |
Page 12 highlights
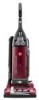
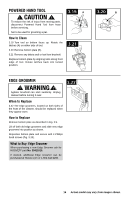
Final Filter ! CAUTION ! To reduce the risk of injury from moving parts, unplug vacuum before servicing. Do not operate cleaner without either the secondary or final filter in place. The final filter assists in the filtration process to return clean air to the room. The 3 layer filter (some models) can be washed in the same manner as the secondary filter and reused. 3.5 To remove final filter, first open the door on the side of the cleaner. Grasp filter (B) and pull it straight out. Reposition new filter by reversing this procedure. How to Reattach Filter Door The filter door is designed with a "break-away" feature which allows it to snap free if it is pushed open too far. 3.5 3.6 C B 3.6 To reattach, align hinges (C) of cover with slots on sides of filter area. Press door back into place. What to Buy: Final Filter Additional filter is available at Hoover.com or call 1-800-944-9200. Use only genuine HOOVER® Final Filter with your vacuum. The final filter can be replaced with any of the following filters: 3 layer, washable - HOOVER® part No. 40110006 Check brushroll channels Because your WindTunnel™ cleaner picks up so well, we strongly recommend you check for debris accumulation in the channels next to the brushroll when you check the filters. Removing this debris will help maintain you cleaner's excellent pick up and suction. ! CAUTION ! To reduce the risk of injury from moving parts, unplug vacuum before servicing. Remove debris as follows: 1) Disconnect cleaner from electrical outlet. 2) Check for debris accumulation by removing bottom plate (Fig. 3.9) and looking in the channels next to the brushroll (Fig. 3.18). 3) Remove any accumulation. 4) Reposition bottom plate (Fig. 3.13). Headlight (Available on some models) ! CAUTION ! To reduce the risk of electrical shock, unplug vacuum before cleaning or servicing. Removing Lens 3.7 Using a Phillips screwdriver, remove the two screws as shown and lift off lens. Installing Bulb and Replacing Lens 3.8 Pull old bulb straight out of socket. Push new bulb straight into socket until locked in place. Excessive force is not required. Reposition lens and secure with the two screws. 3.7 3.8 What to Buy: Headlight This cleaner uses a 12 volt, wedge base type 912 bulb, Hoover part No. 27313101. Additional bulbs may be ordered at Hoover. com or call 1-800-944-9200. Actual model may vary from images shown. 12
-
 1
1 -
2
-
3
-
4
-
5
-
6
-
 7
7 -
 8
8 -
 9
9 -
 10
10 -
 11
11 -
 12
12 -
 13
13 -
 14
14 -
 15
15 -
 16
16 -
 17
17 -
18
-
19
-
20
-
21
-
22
-
23
-
24
-
25
-
26
-
27
-
28
-
29
-
30
-
31
-
32
-
33
-
34
-
35
-
36
-
37
-
38
-
39
-
40
-
41
-
42
-
43
-
44
-
45
-
46
-
47
-
48
-
49
-
50
-
51
-
52
-
53
-
54
 |
 |
