Hoveround MPV5 User Manual - Page 47
Controller Removal/Replacement
 |
View all Hoveround MPV5 manuals
Add to My Manuals
Save this manual to your list of manuals |
Page 47 highlights
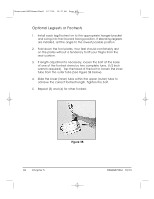
Hoveround-MPV5ManualRevM 1/17/14 10:37 AM Page 47 Chapter 7 Disassembling and Reassembling Your MPV5 Controller Removal/Replacement Removal 1. Check that vehicle power is OFF. 2. Lift the arm and loosen the socket head cap screw closest to the controller. Use the 1/4 inch hex wrench supplied with your chair (See Figure 7A, below). 3. Slide the controller bracket forward until it hits the key slot. (See Figure 7B, below). Remove bracket from arm and place on footrest or other safe location. Unlock cable from seat. (See Figures 7C, Page 44). Cap Screw Keyhole Figure 7A Figure 7B Replacement 1. Loosen forward socket head cap screw. 2. Position key hole portion of bracket over screw and slide into place. 3. Position controller in a comfortable position and secure screw. 4. Fasten the controller cable on to the catch on the lower seat (See Figure 7D, page 44). D82008753M 10/13 Chapter 7 47
-
 1
1 -
2
-
3
-
4
-
5
-
6
-
7
-
8
-
9
-
10
-
11
-
12
-
13
-
14
-
15
-
16
-
17
-
18
-
19
-
20
-
21
-
22
-
23
-
24
-
25
-
26
-
27
-
28
-
29
-
30
-
31
-
32
-
33
-
34
-
35
-
36
-
37
-
38
-
39
-
40
-
41
-
 42
42 -
 43
43 -
 44
44 -
 45
45 -
 46
46 -
 47
47 -
 48
48 -
 49
49 -
 50
50 -
 51
51 -
 52
52 -
53
-
54
-
55
-
56
-
57
-
58
-
59
-
60
-
61
-
62
-
63
-
64
-
65
-
66
-
67
-
68
 |
 |
