Husqvarna V548 - 2023 Owner Manual - Page 21
To examine the blades, To remove the deck drive belt, To remove, the deck drive belt
 |
View all Husqvarna V548 - 2023 manuals
Add to My Manuals
Save this manual to your list of manuals |
Page 21 highlights
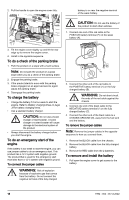
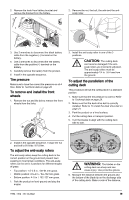
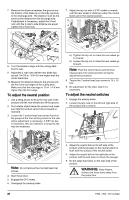
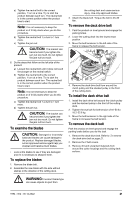
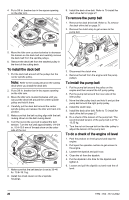
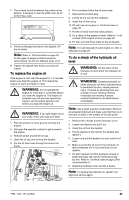
a) Tighten the neutral bolt to the correct position, 1 turn at a time. Try to start the product between each turn. The neutral bolt is in the correct position when the product tries to start. Note: It is not necessary to keep the product on if it fully starts when you do this procedure. b) Tighten the neutral bolt ½ a turn to 1 turn more. c) Tighten the jam nut. CAUTION: The bracket can become bent if you tighten the jam nut too much. Do not tighten the jam nut too much. 6. Do the steps that follow on the left side of the product. a) Loosen the neutral bolt until it does not touch the plunger on the neutral switch. b) Tighten the neutral bolt to the correct position, 1 turn at a time. Try to start the product between each turn. The neutral bolt is in the correct position when the product tries to start. Note: It is not necessary to keep the product on if it fully starts when you do this procedure. c) Tighten the neutral bolt ½ a turn to 1 turn more. d) Tighten the jam nut. CAUTION: The bracket can become bent if you tighten the jam nut too much. Do not tighten the jam nut too much. To examine the blades CAUTION: Damaged or incorrectly balanced blades can cause damage to the product. Replace damaged blades. Let an approved service agent help you sharpen and balance blunt blades. • Look at the blades to see if they are damaged and if it is necessary to sharpen them. To replace the blades 1. Remove the blade bolt. 2. Assemble the new blade with the side without stamps in the direction of the cutting deck. the cutting deck and cause serious injury. Use only approved blades. 3. Attach the blade bolt. Torque the bolt to 45-50 Nm. To remove the deck drive belt 1. Park the product on level ground and engage the parking brake. 2. Lower the cutting deck into the lowest mow position. 3. Move the belt tensioner to the left side of the frame to release the belt tension. 4. Remove the deck drive belt from around the clutch pulley and the stacked pulley in the front of the cutting deck. To install the deck drive belt 1. Install the deck drive belt around the clutch pulley and the stacked pulley in the front of the cutting deck. 2. Tighten the eye bolt for belt tension of 40-50 lb / 18.2-22.6 kg. 3. Move the belt tensioner to the right side of the frame to increase the belt tension. To remove the deck belt Park the product on level ground and engage the parking brake before you do this task. 1. Remove the deck drive belt. Refer to To remove the deck drive belt on page 21. 2. Remove the 2 belt covers. 3. Remove dirt and unwanted materials from around the cutter housings and the cutting deck surface. WARNING: Incorrect blade type can cause objects to eject from 1994 - 002 - 05.12.2022 21
-
 1
1 -
2
-
3
-
4
-
5
-
6
-
7
-
8
-
9
-
10
-
11
-
12
-
13
-
14
-
15
-
 16
16 -
 17
17 -
 18
18 -
 19
19 -
 20
20 -
 21
21 -
 22
22 -
 23
23 -
 24
24 -
 25
25 -
 26
26 -
27
-
28
-
29
-
30
-
31
-
32
-
33
-
34
-
35
-
36
-
37
-
38
-
39
-
40
-
41
-
42
-
43
-
44
-
45
-
46
-
47
-
48
-
49
-
50
-
51
-
52
-
53
-
54
-
55
-
56
-
57
-
58
-
59
-
60
-
61
-
62
-
63
-
64
-
65
-
66
-
67
-
68
 |
 |
