IBM 436854u Service Guide - Page 119
Replace the hard disk drive fan assembly
 |
UPC - 883436026772
View all IBM 436854u manuals
Add to My Manuals
Save this manual to your list of manuals |
Page 119 highlights
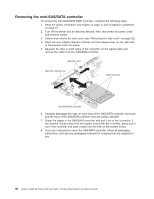
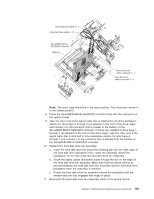
Hard disk drive cable 0 - 3 Hard disk drive cable 4 - 7 ServeRAID-MR10i SAS/SATA controller Battery Hard disk drive cable connector 4 - 7 Hard disk drive cable connector 0 - 3 Note: The drive cage should be in the open position. This illustration shows it in the closed position. 8. Press the ServeRAID-MR10i SAS/SATA controller firmly into the connector on the system board. 9. Take the other end of the signal cable that is attached to the drive backplane section for drive bays 0 through 3 (as labeled on the front of the drive cage) and connect it to the connector that is closest to the battery on the ServeRAID-MR10i SAS/SATA controller. If drives are installed in drive bays 4 through 7 (as labeled on the front of the drive cage), take the other end of the signal cable that is attached to drive backplane section for drive bays 4 through 7 and connect it to the connector that is farthest from the battery on the ServeRAID-MR10i SAS/SATA controller. 10. Replace the hard disk drive fan assembly: a. Insert the hard disk drive fan assembly retaining tab over the right edge of the hard disk drive backplane; then, rotate the assembly toward the backplane. Do not fully close the hard disk drive fan assembly. b. Route the signal cables and power cable through the slot on the edge of the hard disk drive fan assembly. Make sure that the cables will not be pinched between the hard disk drive fan assembly and the hard disk drive backplane when the assembly is installed. c. Rotate the hard disk drive fan assembly toward the backplane until the release tabs are fully engaged and snaps in place. 11. Reconnect the hard disk drive fan assembly cable to the system board. Chapter 4. Removing and replacing server components 101
-
 1
1 -
2
-
3
-
4
-
5
-
6
-
7
-
8
-
9
-
10
-
11
-
12
-
13
-
14
-
15
-
16
-
17
-
18
-
19
-
20
-
21
-
22
-
23
-
24
-
25
-
26
-
27
-
28
-
29
-
30
-
31
-
32
-
33
-
34
-
35
-
36
-
37
-
38
-
39
-
40
-
41
-
42
-
43
-
44
-
45
-
46
-
47
-
48
-
49
-
50
-
51
-
52
-
53
-
54
-
55
-
56
-
57
-
58
-
59
-
60
-
61
-
62
-
63
-
64
-
65
-
66
-
67
-
68
-
69
-
70
-
71
-
72
-
73
-
74
-
75
-
76
-
77
-
78
-
79
-
80
-
81
-
82
-
83
-
84
-
85
-
86
-
87
-
88
-
89
-
90
-
91
-
92
-
93
-
94
-
95
-
96
-
97
-
98
-
99
-
100
-
101
-
102
-
103
-
104
-
105
-
106
-
107
-
108
-
109
-
110
-
111
-
112
-
113
-
 114
114 -
 115
115 -
 116
116 -
 117
117 -
 118
118 -
 119
119 -
 120
120 -
 121
121 -
 122
122 -
 123
123 -
 124
124 -
125
-
126
-
127
-
128
-
129
-
130
-
131
-
132
-
133
-
134
-
135
-
136
-
137
-
138
-
139
-
140
-
141
-
142
-
143
-
144
-
145
-
146
-
147
-
148
-
149
-
150
-
151
-
152
-
153
-
154
-
155
-
156
-
157
-
158
-
159
-
160
-
161
-
162
-
163
-
164
-
165
-
166
-
167
-
168
-
169
-
170
-
171
-
172
-
173
-
174
-
175
-
176
-
177
-
178
-
179
-
180
-
181
-
182
-
183
-
184
-
185
-
186
-
187
-
188
-
189
-
190
-
191
-
192
-
193
-
194
-
195
-
196
-
197
-
198
-
199
-
200
-
201
-
202
-
203
-
204
-
205
-
206
-
207
-
208
-
209
-
210
-
211
-
212
-
213
-
214
-
215
-
216
-
217
-
218
-
219
-
220
-
221
-
222
-
223
-
224
-
225
-
226
-
227
-
228
-
229
-
230
-
231
-
232
-
233
-
234
-
235
-
236
-
237
-
238
-
239
-
240
-
241
-
242
-
243
-
244
-
245
-
246
-
247
-
248
-
249
-
250
-
251
-
252
-
253
-
254
-
255
-
256
-
257
-
258
-
259
-
260
-
261
-
262
-
263
-
264
-
265
-
266
 |
 |
