IBM 79717au User Guide - Page 37
Attention
 |
UPC - 883436004305
View all IBM 79717au manuals
Add to My Manuals
Save this manual to your list of manuals |
Page 37 highlights
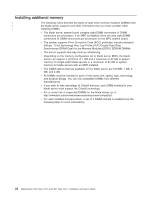
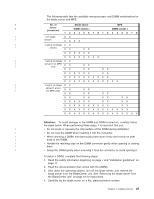
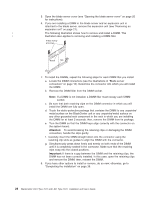
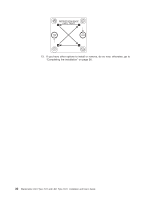
The following table lists the available microprocessor and DIMM combinations for the blade server and MPE. | No. of Blade server MPE | microprocessors DIMM socket x DIMM socket x 123456781234 5 678 | 1 (in blade X X | server) X X X X | 1 and 2 (in blade X X | server) X X X X X X X X X X X X X X X X X X | 1 and 2 (in blade X X | | server)1 (in MPE unit) X X X X X X X X X X X X X X X X X X X X X X X X X X X X X X XX X XXXX X XX | 1 and 2 (in blade X X | | server)1 and 2 X X (in MPE unit) X X X X X X X X X X X X X X X X X X X X X X X X X X X X X X X X X X X X X X XXXXXXXXXXXX X X XXXXXXXXXXXX X XXX Attention: To avoid damage to the DIMM and DIMM connectors, carefully follow the steps below. When performing these steps, it is important that you: | v Do not press or squeeze the chip surface of the DIMM during installation. | v Do not rock the DIMM when inserting it into the connector. | v When inserting a DIMM, simultaneously press down firmly and evenly on both | ends of the DIMM. | v Handle the retaining clips on the DIMM connector gently when opening or closing | them. | v Grasp the DIMM gently when removing it from the connector to avoid ejecting it. To install a DIMM, complete the following steps: 1. Read the safety information beginning on page v and "Installation guidelines" on page 17. 2. Read the documentation that comes with the DIMMs. 3. Shut down the operating system, turn off the blade server, and remove the blade server from the BladeCenter unit. See "Removing the blade server from the BladeCenter unit" on page 19 for instructions. 4. Carefully lay the blade server on a flat, static-protective surface. Chapter 3. Installing options 25
-
 1
1 -
2
-
3
-
4
-
5
-
6
-
7
-
8
-
9
-
10
-
11
-
12
-
13
-
14
-
15
-
16
-
17
-
18
-
19
-
20
-
21
-
22
-
23
-
24
-
25
-
26
-
27
-
28
-
29
-
30
-
31
-
 32
32 -
 33
33 -
 34
34 -
 35
35 -
 36
36 -
 37
37 -
 38
38 -
 39
39 -
 40
40 -
 41
41 -
 42
42 -
43
-
44
-
45
-
46
-
47
-
48
-
49
-
50
-
51
-
52
-
53
-
54
-
55
-
56
-
57
-
58
-
59
-
60
-
61
-
62
-
63
-
64
-
65
-
66
-
67
-
68
-
69
-
70
-
71
-
72
-
73
-
74
-
75
-
76
-
77
-
78
-
79
-
80
-
81
-
82
-
83
-
84
 |
 |
