Icom ID-52A About The Dv Gateway Function - Page 11
Setting up the RS-MS3W, Connecting the data cable, COM port settings
 |
View all Icom ID-52A manuals
Add to My Manuals
Save this manual to your list of manuals |
Page 11 highlights
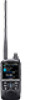
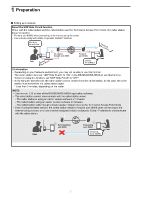
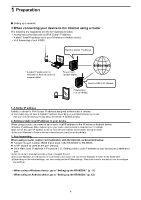
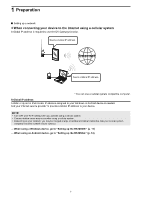
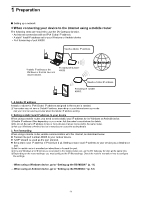
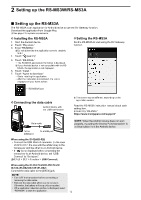
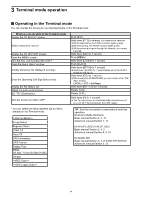
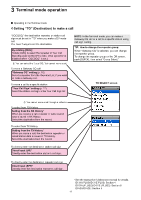
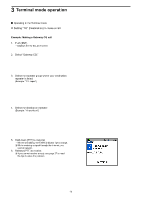
2 Setting up the RS-MS3W/RS-MS3A ■■Setting up the RS-MS3W The RS-MS3W is a Windows application to use the DV Gateway function. You can download it from the Icom website. LLSee page 2 for system requirements. DDInstalling the RS-MS3W Download the latest RS-MS3W and its instruction manual from the Icom website. Read the RS-MS3W instruction manual on how to install the software. LLSearch by "RS-MS3W." https://www.icomjapan.com/support/ DDSetting the RS-MS3W Set the RS-MS3W to start using the DV Gateway function. DDConnecting the data cable Connect the transceiver to the Windows using the data cable. Data cable Windows To the [USB] port To a USB port When using the ID-52A/ID-52E If " " is not displayed when connecting the transceiver to a PC, set "USB Connect" to "Serialport." ([MENU] > SET > Function > USB Connect) When using the ID-31A PLUS/ID-31E PLUS/ ID-51A (PLUS2)/ID-51E (PLUS2) Connect the data cable to the [DATA] jack. NOTE: Turn OFF the transceiver before connecting or disconnecting the data cable. DDCOM port settings Set the data port. 1. After connecting, turn ON the transceiver. 2. Click "Com Port (P)" in the "Settings (S)." •• Com Port Setting window is displayed. 3. Select the COM port number that the data cable is connected to. LLClick "▼" to display the COM ports on a drop-down list. LLSee the data cable's Installation Guide you can download on the Icom website, for details on checking the COM port number. 4. Click . LLThe screen may be different, depending on the application version. Read the RS-MS3W instruction manual about each setting item. NOTE: About the Firewall setting When you use a firewall security software, a communication error may occur by the firewall blocking the necessary ports or data. Before using the DV Gateway function, confirm that the RS-MS3W's communication is not blocked. LLAsk your firewall security software's manufacturer about the setting details. 11
-
 1
1 -
2
-
3
-
4
-
5
-
 6
6 -
 7
7 -
 8
8 -
 9
9 -
 10
10 -
 11
11 -
 12
12 -
 13
13 -
 14
14 -
 15
15 -
 16
16 -
17
-
18
-
19
-
20
-
21
-
22
-
23
-
24
-
25
-
26
-
27
-
28
-
29
 |
 |