Image Fitness 933 Treadmill English Manual - Page 7
Image Fitness 933 Treadmill Manual
 |
View all Image Fitness 933 Treadmill manuals
Add to My Manuals
Save this manual to your list of manuals |
Page 7 highlights
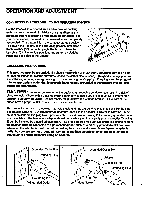
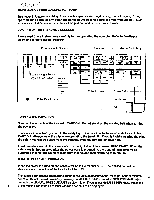
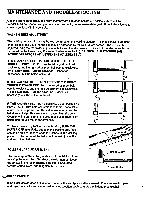
The speed of the walking belt can be controlled using the INCREASE and DECREASE buttons beside the MANUAL SPEED ADJUST display. Each time one of the buttons is pressed, the speed will increase or decrease by 0.1 mile per hour. The buttons can be held down to change the speed quickly. Press the INCREASE button until the walking belt begins to move at slow speed. Hold the handrail and step carefully onto the walking belt. As you exercise, the speed of the walking belt can be changed as desired. To stop the walking belt, hold down the DECREASE button. The walking belt can be stopped quickly, if necessary, by pressing the STOP button. CAUTION: After the INCREASE or DECREASE buttons are pressed, it will take a few seconds for the walking belt to reach the selected speed setting. Adjust the speed gradually until you are familiar with the operation of the treadmill. As the INCREASE or DECREASE buttons are pressed, the display will show the selected speed setting. The display will then change to show the actual speed of the walking belt, until the belt reaches the selected speed setting. To vary the intensity of your exercise, the incline of the treadmill can be changed, from 1.5% to 10%. Press the INCREASE or DECREASE buttons beside the MANUAL INCLINE ADJUST display to change the incline. Each time one of the buttons is pressed, the incline will increase or decrease by 0.5%. The buttons can be held down to change the incline quickly. PROGRAMMABLE TREADMILL OPERATION - When the console is in the programmable mode, the speed of the walking belt will be controlled automatically by programs you select. Four different preset programs are offered. In addition, an endless number of custom programs can be created. Up to four custom programs can be stored in memory. CREATING A CUSTOM PROGRAM Press one of the four INDIVIDUAL PROGRAM buttons. Be sure that the walking belt is fully stopped before you continue. The first step in creating a custom program is to set a speed range for the program. Press the MAXIMUM SPEED (SET) button beneath the TIME/MAX SPEED SET display. The minimum speed the walking belt can move during a program is 1.5 miles per hour. The maximum speed the walking belt can move is set at 3 miles per hour, as shown in the display. The maximum speed setting can be changed, if desired, by pressing the INCREASE or DECREASE buttons beneath the display. Each time one of the buttons is pressed, the setting will change by 0.1 mile per hour. The buttons can be held down to change the setting quickly. The maximum speed setting can be from 2 to 10 miles per hour. All custom and preset programs are divided into eight equal time periods, called °segments." The speed of the walking belt will change automatically at the beginning of each segment. The speed settings can be programmed on the eight vertical segments of the PROGRAM SEGMENTS display. The setting of each segment is shown by the number of bars lighted in the segment. If one bar is lighted, the segment is set for 1.5 miles per hour. If all eight bars are lighted, the segment is set for the maximum speed. If a program has not previously been created, the same number of bars will be lighted in all eight segments. The first segment of the PROGRAM SEGMENTS display will be flashing. To program the first segment, press the SEGMENT UP or SEGMENT DOWN buttons beneath the display until the desired number of bars is lighted. Each time the SEGMENT UP button is pressed, a tone will sound and the setting will increase. Every few times the button is pressed, an additional bar will light. Each time the SEGMENT DOWN button is pressed, a tone will sound and the setting will decrease. Every few times the button is ' pressed, a bar will darken. The buttons can be held down to program the segment quickly. After the first segment is programmed, press the RIGHT button beneath the display. The first segment will stop flashing, and the second segment will begin to flash. Program the second segment in the same 7
-
 1
1 -
 2
2 -
 3
3 -
 4
4 -
 5
5 -
 6
6 -
 7
7 -
 8
8 -
 9
9 -
 10
10 -
 11
11 -
 12
12 -
13
-
14
-
15
-
16
 |
 |