Insignia NS-TDRE75W1 User Guide - Page 29
Step 3: Move the hinges, the dryer door where the hinges used to be. Make sure that the hinge plugs
 |
View all Insignia NS-TDRE75W1 manuals
Add to My Manuals
Save this manual to your list of manuals |
Page 29 highlights
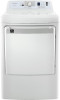
INSTALLATION INSTRUCTIONS 10-Cycle Electric and Gas Dryers Step 3: Move the hinges 1 Lift off each hinge, turn it around (180°), and place it on the other side of the dryer door. Make sure that the hinge is aligned with the holes in the door. 2 Remove the two hinge plugs from the inside door cover, then place them in the dryer door where the hinges used to be. Make sure that the hinge plugs are aligned with the holes in the door. www.insigniaproducts.com 29
-
 1
1 -
2
-
3
-
4
-
5
-
6
-
7
-
8
-
9
-
10
-
11
-
12
-
13
-
14
-
15
-
16
-
17
-
18
-
19
-
20
-
21
-
22
-
23
-
 24
24 -
 25
25 -
 26
26 -
 27
27 -
 28
28 -
 29
29 -
 30
30 -
 31
31 -
 32
32 -
 33
33 -
 34
34 -
35
-
36
-
37
-
38
-
39
-
40
-
41
-
42
-
43
-
44
 |
 |

29
www.insigniaproducts.com
10-Cycle Electric and Gas Dryers
INSTALLATION INSTRUCTIONS
Step 3: Move the hinges
1
Lift off each hinge, turn it around (180°), and place it on the other side of the
dryer door. Make sure that the hinge is aligned with the holes in the door.
2
Remove the two hinge plugs from the inside door cover, then place them in
the dryer door where the hinges used to be. Make sure that the hinge plugs
are aligned with the holes in the door.