Intel SE7230NH1 User Guide - Page 33
Removing Protective Processor Cover, Installing the Processor,
 |
View all Intel SE7230NH1 manuals
Add to My Manuals
Save this manual to your list of manuals |
Page 33 highlights
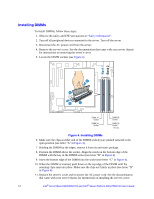
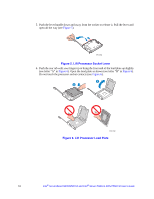
7. Take the processor out of the box and remove the protective shipping cover (see Figure 7). TP01789 Figure 7. Removing Protective Processor Cover 8. Orient the processor with the socket so that the processor cutout matches the socket notch (see letter "A" in Figure 8), and insert the processor into the socket (see letter "B" in Figure 8). A B TP01790 Figure 8. Installing the Processor 9. Grasp the socket protective cover tab and pull away from the load plate (see letter "A" in Figure 9). Remove the socket protective cover and store for future use (see letter "B" in Figure 9). A B TP01788 Figure 9. Removing the Socket Protective Cover Intel® Server Board SE7230NH1-E and Intel® Server Platform SR1475NH1-E User's Guide 17
-
 1
1 -
2
-
3
-
4
-
5
-
6
-
7
-
8
-
9
-
10
-
11
-
12
-
13
-
14
-
15
-
16
-
17
-
18
-
19
-
20
-
21
-
22
-
23
-
24
-
25
-
26
-
27
-
 28
28 -
 29
29 -
 30
30 -
 31
31 -
 32
32 -
 33
33 -
 34
34 -
 35
35 -
 36
36 -
 37
37 -
 38
38 -
39
-
40
-
41
-
42
-
43
-
44
-
45
-
46
-
47
-
48
-
49
-
50
-
51
-
52
-
53
-
54
-
55
-
56
-
57
-
58
-
59
-
60
-
61
-
62
-
63
-
64
-
65
-
66
-
67
-
68
-
69
-
70
-
71
-
72
-
73
-
74
-
75
-
76
-
77
-
78
-
79
-
80
-
81
-
82
-
83
-
84
-
85
-
86
-
87
-
88
-
89
-
90
 |
 |

Intel
®
Server Board SE7230NH1-E and Intel
®
Server Platform SR1475NH1-E User’s Guide
17
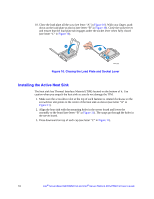
7.
Take the processor out of the box and remove the protective shipping cover (see
Figure 7
).
Figure 7. Removing Protective Processor Cover
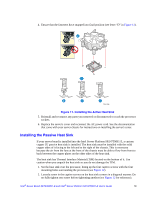
8.
Orient the processor with the socket so that the processor cutout matches the socket
notch (see letter “A” in
Figure 8
), and insert the processor into the socket (see letter
“B” in
Figure 8
).
Figure 8. Installing the Processor
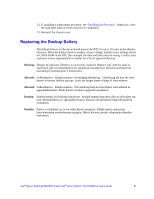
9.
Grasp the socket protective cover tab and pull away from the load plate (see letter “A”
in
Figure 9
). Remove the socket protective cover and store for future use (see letter
“B” in
Figure 9
).
Figure 9. Removing the Socket Protective Cover
TP01789
TP01790
A
B
TP01788
A
B