Intel SE7230NH1 User Guide - Page 34
Installing the Active Heat Sink
 |
View all Intel SE7230NH1 manuals
Add to My Manuals
Save this manual to your list of manuals |
Page 34 highlights
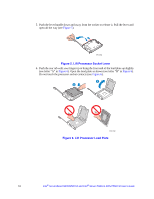
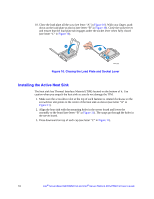
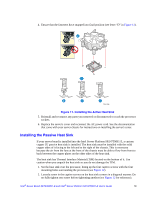
10. Close the load plate all the way (see letter "A" in Figure 10). With your finger, push down on the load plate as shown (see letter "B" in Figure 10). Close the socket lever and ensure that the load plate tab engages under the socket lever when fully closed (see letter "C" in Figure 10). A C B TP01791 Figure 10. Closing the Load Plate and Socket Lever Installing the Active Heat Sink The heat sink has Thermal Interface Material (TIM) located on the bottom of it. Use caution when you unpack the heat sink so you do not damage the TIM. 1. Make sure the screwdriver slot at the top of each fastener is rotated clockwise so the screwdriver slot points to the center of the heat sink as shown (see letter "A" in Figure 11). 2. Align the heat sink with the mounting holes in the server board and lower the assembly to the board (see letter "B" in Figure 11). The snaps go through the holes in the server board. 3. Press downward on top of each cap (see letter "C" in Figure 11). 18 Intel® Server Board SE7230NH1-E and Intel® Server Platform SR1475NH1-E User's Guide
-
 1
1 -
2
-
3
-
4
-
5
-
6
-
7
-
8
-
9
-
10
-
11
-
12
-
13
-
14
-
15
-
16
-
17
-
18
-
19
-
20
-
21
-
22
-
23
-
24
-
25
-
26
-
27
-
28
-
 29
29 -
 30
30 -
 31
31 -
 32
32 -
 33
33 -
 34
34 -
 35
35 -
 36
36 -
 37
37 -
 38
38 -
 39
39 -
40
-
41
-
42
-
43
-
44
-
45
-
46
-
47
-
48
-
49
-
50
-
51
-
52
-
53
-
54
-
55
-
56
-
57
-
58
-
59
-
60
-
61
-
62
-
63
-
64
-
65
-
66
-
67
-
68
-
69
-
70
-
71
-
72
-
73
-
74
-
75
-
76
-
77
-
78
-
79
-
80
-
81
-
82
-
83
-
84
-
85
-
86
-
87
-
88
-
89
-
90
 |
 |
