Intel SE7320SP2 User Guide - Page 27
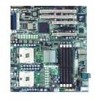
Installing Heat Sink over Processor
 |
UPC - 735858168731
View all Intel SE7320SP2 manuals
Add to My Manuals
Save this manual to your list of manuals |
Page 27 highlights
Server Board Installations and Upgrades 7. Remove the heat sink from its packaging. The heat sink has thermal interface material (TIM) applied to the bottom of it. Be careful not to damage the TIM when you handle the heat sink. 8. Set the heat sink on top of the processor, aligning the captive screws in the heat sink with the standoffs around the processor socket. See Figure 8, letter A. Your heat sink style may vary. 9. Finger-tighten each captive screw, working around the heat sink. Tighten the screws evenly. Do not fully tighten one screw at a time. Continue to gradually and evenly tighten each screw, working around the heat sink. See Figure 8, letter B. 10. Server Chassis SC5275-E only: Connect the heat sink fan cable to the processor fan connector. B A TP00748 Figure 8. Installing Heat Sink over Processor 11. Reconnect or replace any internal components you needed to disconnect or remove. 12. Replace the server's cover. Reconnect any external components you needed to disconnect. 13. Attach the AC power cord. Intel Server Board SE7320SP2 / SE7525GP2 User Guide 27
-
 1
1 -
2
-
3
-
4
-
5
-
6
-
7
-
8
-
9
-
10
-
11
-
12
-
13
-
14
-
15
-
16
-
17
-
18
-
19
-
20
-
21
-
 22
22 -
 23
23 -
 24
24 -
 25
25 -
 26
26 -
 27
27 -
 28
28 -
 29
29 -
 30
30 -
 31
31 -
 32
32 -
33
-
34
-
35
-
36
-
37
-
38
-
39
-
40
-
41
-
42
-
43
-
44
-
45
-
46
-
47
-
48
-
49
-
50
-
51
-
52
-
53
-
54
-
55
-
56
-
57
-
58
-
59
-
60
 |
 |
