Intel SR2520SAXR User Guide - Page 67
Installng Optical Drive into the Drive Bracket, Removing Optical Drive
 |
UPC - 735858197335
View all Intel SR2520SAXR manuals
Add to My Manuals
Save this manual to your list of manuals |
Page 67 highlights
7. Install the optical drive to the drive bracket (see letter "A" in the figure below) and secure it with four screws (see letter "B" in the figure below). B A AF001826 Figure 32. Installng Optical Drive into the Drive Bracket 8. First time installation: remove the optical drive knockout in the chassis sheet meta as shown in the figure belowl. AF001827 Figure 33. Removing Optical Drive Knockout 9. Lower the drive bracket into the system and slide it forward into place (see letter "A" in the figure below). 10. Secure the drive bracket into place with four screws (see letter "B" in the figure below). Intel® Server System SR2520SA User's Guide 45
-
 1
1 -
2
-
3
-
4
-
5
-
6
-
7
-
8
-
9
-
10
-
11
-
12
-
13
-
14
-
15
-
16
-
17
-
18
-
19
-
20
-
21
-
22
-
23
-
24
-
25
-
26
-
27
-
28
-
29
-
30
-
31
-
32
-
33
-
34
-
35
-
36
-
37
-
38
-
39
-
40
-
41
-
42
-
43
-
44
-
45
-
46
-
47
-
48
-
49
-
50
-
51
-
52
-
53
-
54
-
55
-
56
-
57
-
58
-
59
-
60
-
61
-
 62
62 -
 63
63 -
 64
64 -
 65
65 -
 66
66 -
 67
67 -
 68
68 -
 69
69 -
 70
70 -
 71
71 -
 72
72 -
73
-
74
-
75
-
76
-
77
-
78
-
79
-
80
-
81
-
82
-
83
-
84
-
85
-
86
-
87
-
88
-
89
-
90
-
91
-
92
-
93
-
94
-
95
-
96
-
97
-
98
-
99
-
100
-
101
-
102
-
103
-
104
-
105
-
106
-
107
-
108
-
109
-
110
-
111
-
112
-
113
-
114
-
115
-
116
-
117
-
118
-
119
-
120
-
121
-
122
-
123
-
124
-
125
-
126
-
127
-
128
-
129
-
130
-
131
-
132
-
133
-
134
-
135
-
136
-
137
-
138
-
139
-
140
-
141
-
142
-
143
-
144
-
145
-
146
-
147
-
148
-
149
-
150
-
151
-
152
-
153
-
154
-
155
-
156
-
157
-
158
-
159
-
160
-
161
-
162
-
163
-
164
 |
 |

Intel
®
Server System SR2520SA User’s Guide
45
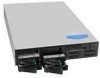
7.
Install the optical drive to the drive bracket (see letter “A” in the figure below) and
secure it with four screws (see letter “B” in the figure below).
Figure 32. Installng Optical Drive into the Drive Bracket
8.
First time installation: remove the optical drive knockout in the chassis sheet meta
as shown in the figure belowl.
Figure 33. Removing Optical Drive Knockout
9.
Lower the drive bracket into the system and slide it forward into place (see letter
“A” in the figure below).
10.
Secure the drive bracket into place with four screws (see letter “B” in the figure
below).
B
A
AF001826
AF001827