Intel SRCU42L User Guide - Page 30
Firmware Recovery Procedure via Flash Recovery, Utility FRU - firmware update
 |
UPC - 735858157872
View all Intel SRCU42L manuals
Add to My Manuals
Save this manual to your list of manuals |
Page 30 highlights
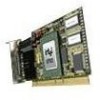
Flash Memory Programming Warning: Do not interrupt the update process to avoid damaging the firmware image in the Flash. If the firmware is interrupted you will need to follow the firmware recovery process in the next section. After StorCon indicates that the update is complete, press any key. 9. The focus returns to the Configure Controller submenu. Press several times to close the menus and press to quit StorCon. 10. StorCon detects the firmware update and requires a system reboot. Press any key to reboot. When the update process has completed, reboot the computer for the change to take effect. During boot up, the system displays the updated firmware version. You can also relaunch StorCon and select the applicable RAID controller to view its new firmware version at the bottom of the console (for example, FW:2.34.yy-Rzzz). You can also use the OS version of StorCon to update the firmware. Refer to the Storage Console chapter of the Software Guide for more details. A.2 Firmware Recovery Procedure via Flash Recovery Utility (FRU) Figure A-1. Jumper Positions for Flash Update and Recovery Jumper Block J4 12 3 Reset / Flash Recovery 1 23 Normal-Run / Flash Update 1. Set the IIR controller's IOP to Reset (Flash Recovery) mode: Warning: Shock hazards may be present inside the unit in which this controller is being installed. Disconnect all power cords to the unit before removal of any covers. Follow the warnings noted in your computer's user or service manual before installing this board. ONLY after all the covers are reinstalled should you reconnect the power cords and power up the unit for the software installation and use. a. Take all precautions to prevent ESD damage before handling the IIR controller. b. Power off all system components and disconnect their power cords. c. Remove the cover from the system to gain access to the PCI slots. d. Remove the IIR controller from your system. 30 Hardware Installation and User's Guide
-
 1
1 -
2
-
3
-
4
-
5
-
6
-
7
-
8
-
9
-
10
-
11
-
12
-
13
-
14
-
15
-
16
-
17
-
18
-
19
-
20
-
21
-
22
-
23
-
24
-
 25
25 -
 26
26 -
 27
27 -
 28
28 -
 29
29 -
 30
30 -
 31
31 -
 32
32 -
 33
33
 |
 |
