Intel SRCU42L User Guide - Page 31
A-1
 |
UPC - 735858157872
View all Intel SRCU42L manuals
Add to My Manuals
Save this manual to your list of manuals |
Page 31 highlights
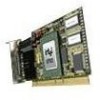
Flash Memory Programming e. On jumper block J4, move the jumper from position 2-3 to position 1-2 (see Figure A-1 and Figure 2-3). Re-install the adapter in the PCI slot in which it was previously installed. f. Replace the cover, reconnect all power cords and power up the system. 2. Change your computer's BIOS setting so that your system boots from the CD-ROM. 3. Use the RAID Software Suite CD-ROM to flash the firmware. a. Boot the computer with the bootable RAID Software Suite CD-ROM that contains the version of the RAID firmware that you wish to recover. b. At the ROM-DOS Startup menu, select the option, Flash Recovery Utility, and press . c. The Flash Recovery Utility detects any RAID controllers that are in reset mode and lists them in the order that they are found. Note: Any RAID controllers that are not in reset mode will not be listed. If no controllers are listed, your controller may not be in reset mode. Shut down the system and start again with step 1 above. Refer to Figure A-1 and Figure 2-3 to set the jumper in reset mode. d. Type a controller number to start the recovery process for the firmware on that controller. You do not need to press Enter after typing the number. You will see the messages shown below during a successful recovery. Each message provides a percent complete status while the action is in progress. The entire process may take several minutes. Erasing flash memory Downloading data to flash memory Verifying flash content with input file Flash upload complete SUCCESS: Operation completed successfully Download complete in 4. Reset the jumper to run mode. a. Power off all system components and disconnect power cords. b. Remove the system cover. c. Remove the IIR controller from your system. d. On Jumper block J4, move jumper from position 1-2 to position 2-3 (see Figure A-1). Reinstall the IIR controller in the PCI slot in which it was previously installed. Reconnect the SCSI drives to the controller. e. Replace the cover, reconnect all power cords and power up the system. 5. Change your computer's system BIOS setting so that your system boots normally (not from the CD-ROM). Note: The firmware recovery returns the controller to the default settings. Hardware Installation and User's Guide 31
-
 1
1 -
2
-
3
-
4
-
5
-
6
-
7
-
8
-
9
-
10
-
11
-
12
-
13
-
14
-
15
-
16
-
17
-
18
-
19
-
20
-
21
-
22
-
23
-
24
-
25
-
 26
26 -
 27
27 -
 28
28 -
 29
29 -
 30
30 -
 31
31 -
 32
32 -
 33
33
 |
 |
