Intermec PX6i Intermec Printer Language (IPL) Developer's Guide (old) - Page 64
To create a user-defined font character for Advanced mode, mode
 |
View all Intermec PX6i manuals
Add to My Manuals
Save this manual to your list of manuals |
Page 64 highlights
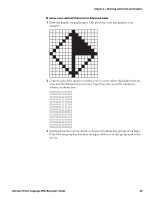
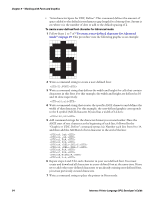
Chapter 3 - Working with Fonts and Graphics • "Intercharacter Space for UDF, Define": This command defines the amount of space added to the default intercharacter gap length for a bitmap font. Syntax is zn, where n is the number of dots to add to the default spacing of 2. To create a user-defined font character for Advanced mode 1 Follow Steps 1 to 7 of "To create a user-defined character for Advanced mode" on page 49. This procedure uses the following graphic as an example: 2 Write a command string to create a user-defined font: T3,FONT3 3 Write a command string that defines the width and height for cells that contain characters in this font. For this example, the width and height are defined as 10 and 14 dots respectively: x10;y14 4 Write a command string that creates the specific ASCII character and defines the width of that character. For this example, the user-defined graphic corresponds to the $ symbol (ASCII character 36) and has a width of 12 dots: t36;z12 5 Add command strings for the character format you created earlier. Place the ASCII start of text character at the beginning of each line, followed by the "Graphic or UDC, Define" command syntax (u). Number each line from 0 to 14, and then add the ASCII end of text character to the end of the line: u0,|q@; u1,~sA; u2,FcA; u3,FcA; u4,C; u5,C; u6,FcA; u7,FcA; u8,NA; u9,L~@; 6 Repeat steps 4 and 5 for each character in your user-defined font. You must create and download all characters in a user-defined font at the same time. If you try to add other user-defined characters to an already existing user-defined font, you erase previously created characters. 7 Write a command string to place the printer in Print mode: 54 Intermec Printer Language (IPL) Developer's Guide
-
 1
1 -
2
-
3
-
4
-
5
-
6
-
7
-
8
-
9
-
10
-
11
-
12
-
13
-
14
-
15
-
16
-
17
-
18
-
19
-
20
-
21
-
22
-
23
-
24
-
25
-
26
-
27
-
28
-
29
-
30
-
31
-
32
-
33
-
34
-
35
-
36
-
37
-
38
-
39
-
40
-
41
-
42
-
43
-
44
-
45
-
46
-
47
-
48
-
49
-
50
-
51
-
52
-
53
-
54
-
55
-
56
-
57
-
58
-
 59
59 -
 60
60 -
 61
61 -
 62
62 -
 63
63 -
 64
64 -
 65
65 -
 66
66 -
 67
67 -
 68
68 -
 69
69 -
70
-
71
-
72
-
73
-
74
-
75
-
76
-
77
-
78
-
79
-
80
-
81
-
82
-
83
-
84
-
85
-
86
-
87
-
88
-
89
-
90
-
91
-
92
-
93
-
94
-
95
-
96
-
97
-
98
-
99
-
100
-
101
-
102
-
103
-
104
-
105
-
106
-
107
-
108
-
109
-
110
-
111
-
112
 |
 |
