JVC D870U Instruction Manual - Page 28
Menus For Detailed Adjustment, Changing The Menu Settings, For Video and, D.S.C., Recording Menus
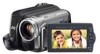 |
UPC - 046838032493
View all JVC D870U manuals
Add to My Manuals
Save this manual to your list of manuals |
Page 28 highlights
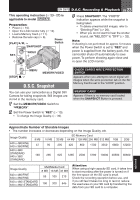
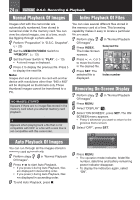
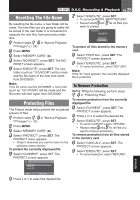
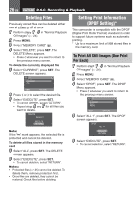
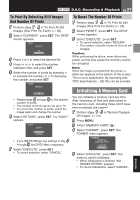
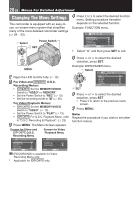
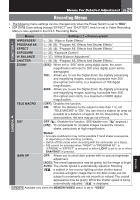
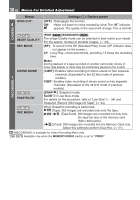
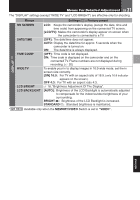
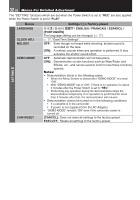
28 EN Menus For Detailed Adjustment Changing The Menu Settings This camcorder is equipped with an easy-touse, on-screen menu system that simplifies many of the more detailed camcorder settings (੬ 28 - 33). 4 Press g or k to select the desired function menu. Setting procedure hereafter depends on the selected function. Example: FUNCTION menu. 1 Select Power Switch 2 SET • Select " " and then press SET to exit. MENU MENU 5 Press e or f to select the desired selection, press SET. Example: WIPE/FADER menu. 1 Select 1 Open the LCD monitor fully. (੬ 12) 2 For Video and D.S.C. Recording Menus: • Set the MEMORY/VIDEO Switch to "VIDEO" or "MEMORY". • Set the Power Switch to "REC" (੬ 13). • Set the recording mode to "M" (੬ 20). For Video Playback Menus: • Set the MEMORY/VIDEO Switch to "VIDEO". (੬ 13) • Set the Power Switch to "PLAY" (੬ 13). • For D.S.C. Playback Menu, refer to "D.S.C. Recording & Playback". (੬ 23) 3 Press MENU. The Menu Screen appears. Screen for Video and D.S.C. Recording Menu Screen for Video Playback Menu 2 SET 6 Press e or f to select the desired selection, press SET. • Press g to return to the previous menu screen. 7 Press MENU. Note: Repeat the procedure if you wish to set other function menus. SNAP/SLOW (RECORDING) is available for Video Recording Menu only. * Applicable for only.
-
 1
1 -
2
-
3
-
4
-
5
-
6
-
7
-
8
-
9
-
10
-
11
-
12
-
13
-
14
-
15
-
16
-
17
-
18
-
19
-
20
-
21
-
22
-
 23
23 -
 24
24 -
 25
25 -
 26
26 -
 27
27 -
 28
28 -
 29
29 -
 30
30 -
 31
31 -
 32
32 -
 33
33 -
34
-
35
-
36
-
37
-
38
-
39
-
40
-
41
-
42
-
43
-
44
-
45
-
46
-
47
-
48
-
49
-
50
-
51
-
52
 |
 |
