JVC KW-NT1 Instructions - Page 10
Parts identification
 |
UPC - 046838037108
View all JVC KW-NT1 manuals
Add to My Manuals
Save this manual to your list of manuals |
Page 10 highlights
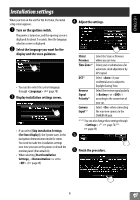
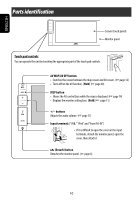
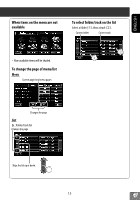
ENGLISH Parts identification Screen (touch panel) Monitor panel Touch pad controls You can operate the unit by touching the appropriate part of the touch pad controls. AV MAP/AV OFF button • Switches the screen between the map screen and AV screen. (☞ page 14) • Turns off/on the AV function. [Hold] (☞ page 48) DISP button • Shows the AV control bars while the map is displayed. (☞ page 14) • Displays the monitor setting bars. [Hold] (☞ page 11) +/− buttons Adjusts the audio volume. (☞ page 11) Input terminals ("USB," "iPod" and "Front AV-IN") • If it is difficult to open the cover on the input terminals, detach the monitor panel, open the cover, then attach it. (Detach) button Detaches the monitor panel. (☞ page 6) 10
-
 1
1 -
2
-
3
-
4
-
 5
5 -
 6
6 -
 7
7 -
 8
8 -
 9
9 -
 10
10 -
 11
11 -
 12
12 -
 13
13 -
 14
14 -
 15
15 -
16
-
17
-
18
-
19
-
20
-
21
-
22
-
23
-
24
-
25
-
26
-
27
-
28
-
29
-
30
-
31
-
32
-
33
-
34
-
35
-
36
-
37
-
38
-
39
-
40
-
41
-
42
-
43
-
44
-
45
-
46
-
47
-
48
-
49
-
50
-
51
-
52
-
53
-
54
-
55
-
56
-
57
-
58
-
59
-
60
-
61
-
62
-
63
-
64
-
65
-
66
-
67
-
68
-
69
-
70
-
71
-
72
-
73
-
74
-
75
-
76
-
77
-
78
-
79
-
80
-
81
-
82
-
83
-
84
-
85
-
86
-
87
-
88
-
89
-
90
-
91
-
92
-
93
-
94
-
95
-
96
-
97
-
98
-
99
-
100
-
101
-
102
-
103
-
104
-
105
-
106
-
107
-
108
-
109
-
110
-
111
-
112
-
113
-
114
-
115
-
116
-
117
-
118
-
119
-
120
-
121
-
122
-
123
-
124
-
125
-
126
-
127
-
128
-
129
-
130
-
131
-
132
-
133
-
134
-
135
-
136
-
137
-
138
-
139
-
140
-
141
-
142
-
143
-
144
-
145
-
146
-
147
-
148
-
149
-
150
-
151
-
152
-
153
-
154
-
155
-
156
-
157
-
158
-
159
-
160
-
161
-
162
-
163
-
164
-
165
-
166
-
167
-
168
-
169
-
170
-
171
-
172
-
173
-
174
-
175
-
176
-
177
-
178
-
179
-
180
-
181
-
182
-
183
-
184
-
185
-
186
-
187
-
188
-
189
-
190
-
191
-
192
-
193
-
194
-
195
-
196
-
197
-
198
-
199
-
200
-
201
-
202
-
203
-
204
-
205
-
206
-
207
-
208
-
209
-
210
-
211
-
212
-
213
-
214
-
215
-
216
-
217
-
218
-
219
-
220
-
221
-
222
-
223
-
224
-
225
-
226
-
227
-
228
-
229
-
230
-
231
-
232
-
233
-
234
-
235
-
236
-
237
-
238
-
239
-
240
-
241
-
242
-
243
-
244
-
245
-
246
-
247
-
248
-
249
-
250
-
251
-
252
-
253
-
254
-
255
-
256
-
257
-
258
-
259
-
260
-
261
-
262
-
263
-
264
-
265
-
266
-
267
-
268
-
269
-
270
-
271
-
272
-
273
-
274
-
275
-
276
-
277
-
278
-
279
-
280
-
281
-
282
-
283
-
284
-
285
-
286
-
287
-
288
-
289
-
290
-
291
-
292
-
293
 |
 |

ENGLISH
10
+/− buttons
Adjusts the audio volume. (
☞
page 11)
AV MAP/AV OFF button
•
Switches the screen between the map screen and AV screen. (
☞
page 14)
•
Turns off/on the AV function. [
Hold
] (
☞
page 48)
(Detach) button
Detaches the monitor panel. (
☞
page 6)
Input terminals
(“USB,” “iPod” and “Front AV-IN”)
Parts identification
Touch pad controls
You can operate the unit by touching the appropriate part of the touch pad controls.
DISP button
•
Shows the AV control bars while the map is displayed. (
☞
page 14)
•
Displays the monitor setting bars. [
Hold
] (
☞
page 11)
Screen (touch panel)
Monitor panel
•
If it is difficult to open the cover on the input
terminals, detach the monitor panel, open the
cover, then attach it.