JVC V25U Startup Guide - Page 27
The top of VN-V25U appears, The [Basic] with the IP address settings appears when DHCP is
 |
View all JVC V25U manuals
Add to My Manuals
Save this manual to your list of manuals |
Page 27 highlights
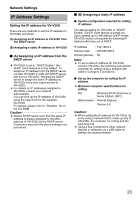
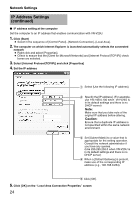
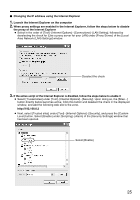
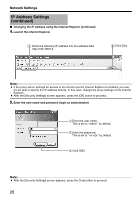
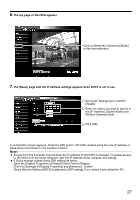
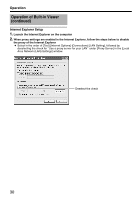
6. The top page of VN-V25U appears Click on [Network], followed by [Basic] on the next submenu. 7. The [Basic] page with the IP address settings appears when DHCP is not in use A Set the [IP Setting] item to [DHCP Disable]. B Enter the values you wish to specify in the [IP Address], [Subnet Mask] and [Default Gateway] fields. C Click [OK]. A confirmation screen appears. Press the [OK] button. VN-V25U restarts using the new IP address. It takes about one minute for the camera to reboot. Note: ● Access from this computer may fail when the IP address of VN-V25U is changed. To enable access to VN-V25U from the same computer, alter the IP address at the computer accordingly. ● If GUI is strange, please check [DPI setting] as below. Open the [Display Properties] at [Start]-[Control Panel]-[Display]. Click the [Settings] of [Display Properties] and [Advanced...] button. Check [Normal Setting (96DPI)] is selected in [DPI setting]. If not, select it and restart the PC. 27
-
 1
1 -
2
-
3
-
4
-
5
-
6
-
7
-
8
-
9
-
10
-
11
-
12
-
13
-
14
-
15
-
16
-
17
-
18
-
19
-
20
-
21
-
 22
22 -
 23
23 -
 24
24 -
 25
25 -
 26
26 -
 27
27 -
 28
28 -
 29
29 -
 30
30 -
 31
31 -
 32
32 -
33
-
34
-
35
-
36
-
37
-
38
-
39
-
40
 |
 |
