Jenn-Air JDRP436HL Owners Manual - Page 20
To Remove Roll-Out Rack, V cutout, Rack guide, Sliding shelf, Slide rails, Oven Vent, Cooling Fan
 |
View all Jenn-Air JDRP436HL manuals
Add to My Manuals
Save this manual to your list of manuals |
Page 20 highlights
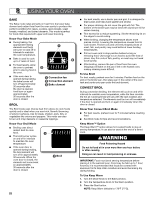
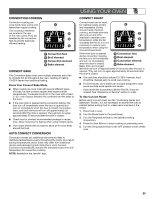
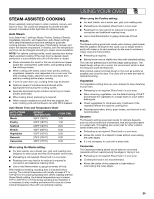
USING YOUR OVEN 6. Pull the rack assembly slightly forward until the front edge drops and the sliding rails are on the rack guide. 2 1 1 "V" cutout 2 Rack guide 2 1 1 "V" cutout 2 Rack guide To Remove Roll-Out Rack 1. Push the sliding shelf in completely so that it is closed and engaged with the slide rails. 1 2 2. Using 2 hands, lift up on the front edge of the rack assembly. Slowly push the rack assembly to the back wall of the oven so the front edge of the sliding shelf sits on the rack guides on the side of the oven cavity. The front edge of the rack should be higher than the back edge. 3. Using 2 hands, lift up the back of the rack assembly so that the front and back are level on the rack guides. 4. Pull the rack assembly out. To avoid damage to the sliding shelves, do not place more than 25 lbs (11.4 kg) on the rack. Do not clean the roll-out rack in a dishwasher. It may remove the rack's lubricant and affect its ability to slide. See the "General Cleaning" section for more information. When placing racks in adjacent positions, start by loading the lower rack positions first and then installing the rack in the position immediately above it. Oven Vent The oven vent should not be blocked or covered since it allows the release of hot air and moisture from the oven. Blocking or covering the vent will cause poor air circulation, affecting cooking and cleaning results. Do not set plastics, paper, or other items that could melt or burn near the oven vent. 1 1 Oven vent Cooling Fan The oven has a dual speed cooling fan motor. When the oven temperature is in the Self-Cleaning cycle, the fan will operate at its highest speed to increase airflow and better exhaust the hotter air through the oven vent(s). An increase in noise may be noticeable until the oven cools. NOTE: Cooling fan may continue to run after the oven has been turned off. 3 1 Sliding shelf 2 Slide rails 3 Rack 20
-
 1
1 -
2
-
3
-
4
-
5
-
6
-
7
-
8
-
9
-
10
-
11
-
12
-
13
-
14
-
 15
15 -
 16
16 -
 17
17 -
 18
18 -
 19
19 -
 20
20 -
 21
21 -
 22
22 -
 23
23 -
 24
24 -
 25
25 -
26
-
27
-
28
-
29
-
30
-
31
-
32
-
33
-
34
-
35
-
36
-
37
-
38
-
39
-
40
-
41
-
42
-
43
-
44
-
45
-
46
-
47
-
48
-
49
-
50
-
51
-
52
-
53
-
54
-
55
-
56
-
57
-
58
-
59
-
60
-
61
-
62
-
63
-
64
-
65
-
66
-
67
-
68
-
69
-
70
-
71
-
72
-
73
-
74
-
75
-
76
 |
 |
