Jenn-Air JGRP548HL Installation Instructions - Page 14
Level Range, Install Griddle Tray, Electronic Ignition System
 |
View all Jenn-Air JGRP548HL manuals
Add to My Manuals
Save this manual to your list of manuals |
Page 14 highlights
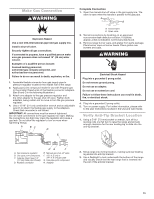
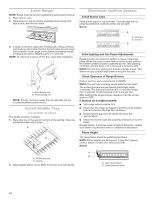
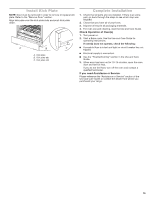
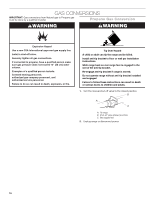
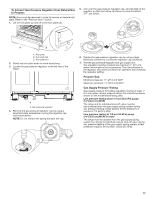
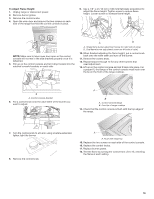
Level Range NOTE: Range must be level for satisfactory baking performance. 1. Place rack in oven. 2. Place level on rack and check levelness of the range, first side to side, then front to back. 3. If range is not level, adjust the leveling rods. Using a wrench, turn leveling rods located behind the kick plate to level range and to raise or lower range to the desired countertop height. Leveling rods can be adjusted up to 11/2" (3.9 cm). NOTE: All roller feet must be off the floor upon final installation. A B A B A. Rear leveling rod B. Front leveling rod NOTE: Turning clockwise raises the unit, whereas turning counterclockwise lowers the unit. Install Griddle Tray (on griddle models) The griddle is factory installed. 1. Place drip tray in the well at the front of the griddle. Slide tray toward the back until it stops. A B Electronic Ignition System Install Burner Caps Place burner caps on top of burner. If burner caps are not properly positioned, surface burners will not light. Burner A A. Incorrect B. Correct B Initial Lighting and Gas Flame Adjustments Range burners use electronic igniters in place of standing pilots. When the range control knob is turned to any position, the system creates a spark to light the burner. This sparking continues until the flame is lit or the knob is turned to OFF. NOTE: The first time igniting the burners will take longer. This allows the gas to reach the burners during the first use. Check Operation of Range Burners Push in and turn each control knob to IGNITE. NOTE: You will hear a clicking sound while the line clears. The surface burners and grill flames should light within 4 seconds. The first time a burner is lit, it may take longer than 4 seconds to light because of air in the gas line. After verifying the proper burner operation, turn the control knobs to OFF. If burners do not light properly: ■ Turn range control knob to OFF. ■ Check that the range is plugged in and the circuit breaker has not tripped or the fuse has not blown. ■ Check that the gas shut-off valves are set to the open position. ■ Check that burner caps are properly positioned on burner bases. Repeat startup. If a burner does not light at this point, contact your dealer or authorized service company for assistance. Flame Height The range flame should be a steady blue flame. NOTE: Flame heights are factory set. If they don't appear correct, please contact your service provider. Burner A. Griddle drip tray B. Griddle 2. Clean griddle before using. Refer to the Use and Care Guide. A B A. Upper (main) flame B. Lower (simmer) flame 14
-
 1
1 -
2
-
3
-
4
-
5
-
6
-
7
-
8
-
 9
9 -
 10
10 -
 11
11 -
 12
12 -
 13
13 -
 14
14 -
 15
15 -
 16
16 -
 17
17 -
 18
18 -
 19
19 -
20
-
21
-
22
-
23
-
24
-
25
-
26
-
27
-
28
-
29
-
30
-
31
-
32
-
33
-
34
-
35
-
36
-
37
-
38
-
39
-
40
-
41
-
42
-
43
-
44
-
45
-
46
-
47
-
48
-
49
-
50
-
51
-
52
-
53
-
54
-
55
-
56
-
57
-
58
-
59
-
60
-
61
-
62
-
63
-
64
-
65
-
66
-
67
-
68
-
69
-
70
-
71
-
72
 |
 |
