Jensen VM9020TS Operation Manual - Page 19
Dvd Setup Menu - remote control
 |
View all Jensen VM9020TS manuals
Add to My Manuals
Save this manual to your list of manuals |
Page 19 highlights
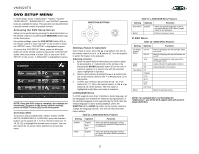
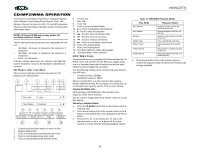
VM9020TS DVD SETUP MENU In "DVD Setup" mode, "LANGUAGE", "VIDEO", "AUDIO" "SURR SETUP", "SURROUND FX", and "RATING" (parental lock) are available for setup. This operation can be performed using the remote control or joystick controls. Accessing the DVD Setup Screen Setup can be performed by pressing the dedicated button on the remote control or by pressing the MENU/SRC button (11) on the front panel. For system settings, press the DVD SETUP button (30) on the remote control or touch "SETUP" on the screen to enter the "SETUP" menu. "SYS SETUP" is highlighted in green. To access the "DVD SETUP" Menu, press the button button (7) on the remote control to choose the "DVD SETUP" option, then press the button (18), or just touch "DVD SETUP" on the screen. "LANGUAGE" is highlighted in green. NOTE: Once the DVD setup is complete, the settings are memorized. To return to the factory default settings, press the RESET button (25) on the front panel. Accessing a Menu To access a menu (LANGUAGE, VIDEO, AUDIO, SURR SETUP, SURROUND FX, or RATING), press the direction buttons on the joystick (6, 7, 8, 9) or remote control (14, 17, 18, 19, 22) to highlight the desired menu in green. You can also touch the on-screen menu selection to access that menu. DIRECTION BUTTONS Selecting a Feature for Adjustment Once inside a menu, press the or buttons (14, 22) on the remote control or the or buttons (6, 7) on the joystick to select the feature to be adjusted. Adjusting a Feature 1. Enter the option field for the feature you want to adjust by pressing the button (18) on the remote or by pressing the ENTER (joystick) button (5) on the unit. A submenu appears in a second row with the selected option highlighted in light blue. 2. Select a new value by pressing the or buttons (14, 22) on the remote control or the or buttons (6, 7) on the joystick. 3. Confirm your selection by pressing the , , or buttons (14, 17, 19) on the remote control, or the or button (8, 9) on the joystick. The new value is highlighted in light blue and setup is complete. LANGUAGE Menu If a DVD supports more than 1 Subtitle or Audio language, all the languages are available for selection during playback. If the selected language is not supported by the DVD, then the default language is used. During playback, press the SUBTITLE (9) or AUDIO (5) button on the remote control to change the language directly. This will not effect the DVD menu settings. Table 11: LANGUAGE Menu Features Setting Options Function Subtitle Audio English Auto Off English Select the default language in which you would like subtitles (if applicable) to be displayed. Select the default language in which you would like audio (when optional) to be played. Table 11: LANGUAGE Menu Features Setting Options Function DVD Menu English BACK Select the default language in which you would like the DVD menu (if applicable) to be displayed. Return to previous menu. VIDEO Menu Table 12: VIDEO Menu Features Setting Options Function TV Shape (Aspect Ratio) Angle Mark View Mode BACK 4:3 PS 4:3 LB 16:9 On Off Fill Original H Fit W Fit Fit to Scrn Pan Scan With 16:9 display, the left and right sides are cut off. With 16:9 display, the top and bottom are cut off. Image is presented in wide view with a 16:9 aspect ratio. Angle indicator (if applicable) is shown. Angle indicator is not shown. Return to previous menu. NOTE: For standard discs not formatted for "widescreen", use of the 16:9 aspect ratio will result in image distortion. 17
-
 1
1 -
2
-
3
-
4
-
5
-
6
-
7
-
8
-
9
-
10
-
11
-
12
-
13
-
 14
14 -
 15
15 -
 16
16 -
 17
17 -
 18
18 -
 19
19 -
 20
20 -
 21
21 -
 22
22 -
 23
23 -
 24
24 -
25
-
26
-
27
-
28
 |
 |
