Jensen VM9020TS Operation Manual - Page 20
Audio Menu, Surr Setup Menu, Surround Fx - dimensions
 |
View all Jensen VM9020TS manuals
Add to My Manuals
Save this manual to your list of manuals |
Page 20 highlights
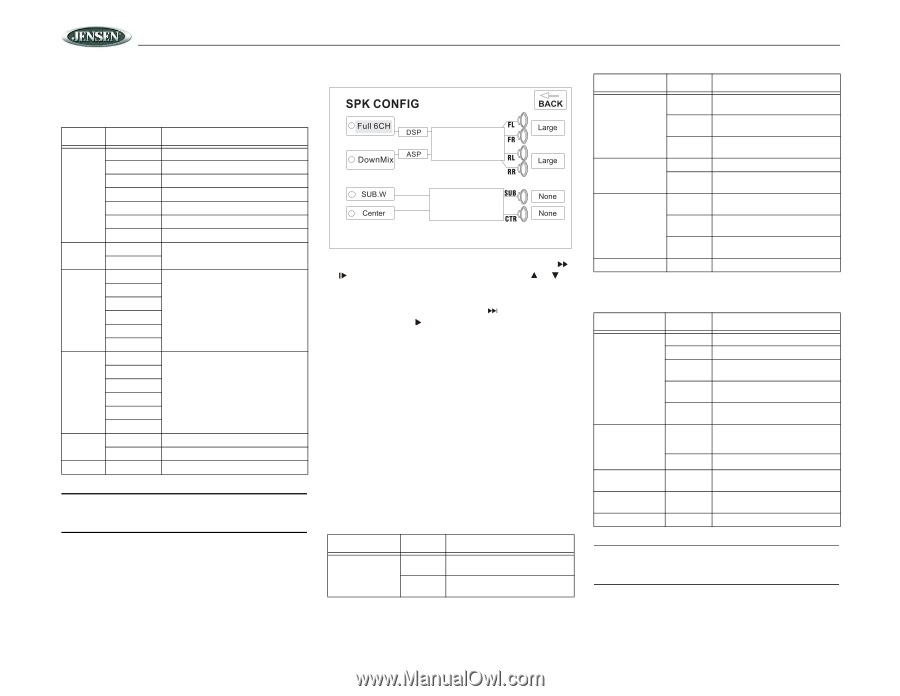
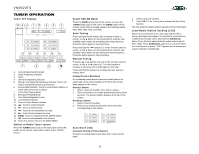
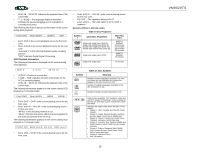
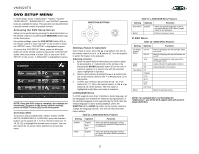
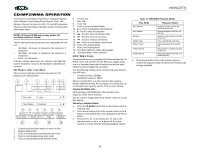
AUDIO Menu The VM9020TS has a built-in Pink Noise generator to help set the relative speaker levels for multi-channel audio playback. Table 13: AUDIO Menu Features Setting Options Function Pink Noise DRC CNTR CTRL REAR CTRL Down Sampling BACK Off Left Center Right Left Surr Right Surr Subwoofer Off On 5ms 4ms 3ms 2ms 1ms 0ms 15ms 12ms 9ms 6ms 3ms 0ms Off on Stop output of pink noise Left channel pink noise Center channel pink noise Right channel pink noise Left surround channel pink noise Right surround channel pink noise Subwoofer pink noise Employ the Dynamic Range Control for better playback for low volumes. Adjust the time difference between the center and front speakers to create a time delay between 1 and 5 milliseconds, producing a more accurate audio effect. Adjust the time difference between the rear and front speakers to create a time delay between 3 and 15 milliseconds, producing a more accurate audio effect. Normal Output Audio signal output at 48kHz Return to previous menu. NOTE: When Down Sampling is ON, the audio output signal will be converted to 48kHz. When Down Sampling is OFF, the original sampling frequency is preserved. SURR SETUP Menu To change speaker settings for 2-channel mode, use the or buttons (14, 22) on the remote control or the or buttons (6, 7) on the joystick to select "DownMix". To change speaker settings for 6-channel mode, select "Full 6CH". After selecting 2 or 6-channel mode, use the button (19) on remote control or the button on the joystick (7) to move to the speaker settings on the right. Speaker Selection Selecting LARGE for the multi-channel speaker option will give a full range output. Selecting SMALL for the multichannel speaker option will activate a high pass filter whose crossover is dependent upon the sub-woofer low pass filter frequency. For example, if the subwoofer low pass filter is set to 80Hz, then the high pass SMALL speaker crossover will be set to 90Hz. Low pass High pass 80Hz 90Hz 120Hz 135Hz 160Hz 180Hz Refer to Table 14 when selecting speaker options for each mode. Table 14: SURR SETUP Menu Features Setting Options Function FL (Front Left) / FR (Front Right) Large Small Use when front speakers have good bass output. Use when speakers do not have good bass output. VM9020TS Table 14: SURR SETUP Menu Features Setting Options Function LR (Left Rear) / RR (Right Rear) Large Small None SUB (Subwoofer) Present None CTR (Center) Large Small None BACK Use when rear speakers have good bass output. Use when rear speakers do not have good bass output. Use when rear speakers are not present. Use when subwoofer is present. Use when subwoofer is not present. Use when center speaker has good bass output. Use when center speaker does not have good bass output. Use when center speaker is not present. Return to previous menu. SURROUND FX Table 15: SURROUND FX Menu Features Setting Options Function Decode Mode Panorama (Only available when Surround I Music Mode is activated.) Dimension Ctrl Center Width Ctrl BACK Off Surround I Surround I Matrix Surround I Movie Surround I Music On Off 0-6 0-6 Play original audio format. Use Surround I decoding method. Play mono output with surround effect. Enhance movie surround effects. Play surround music effects. Extend the video from the front to the rear to achieve a better surround effect. Panorama is turned off. Shift audio output between front and rear speakers. Shift audio output between front and center channel speakers. Return to previous menu. NOTE: Surround I is recommended when the playback source is LPCM (Linear Pulse Code Modulation) or 2channel down mixed digital bit-stream. 18
-
 1
1 -
2
-
3
-
4
-
5
-
6
-
7
-
8
-
9
-
10
-
11
-
12
-
13
-
14
-
 15
15 -
 16
16 -
 17
17 -
 18
18 -
 19
19 -
 20
20 -
 21
21 -
 22
22 -
 23
23 -
 24
24 -
 25
25 -
26
-
27
-
28
 |
 |