Kenmore 3693 Owners Manual - Page 5
Warning, Caution - installation
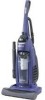 |
View all Kenmore 3693 manuals
Add to My Manuals
Save this manual to your list of manuals |
Page 5 highlights
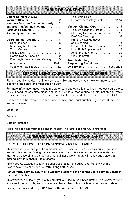
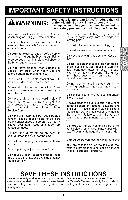
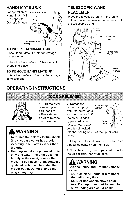
I _b Please pay special attention to these hazard alert boxes, and follow any instructions gainvden.perWsoAnRaNl INiGnjurys.tateCmAeUnTtsIONalesrttatyeomuentots sucahlerdtanygoeurs toassufcirhe, dealencgterircs sahsockp,ersbounrnasl injury and/or property damage, II WARNING Electrical Shock Hazard Do not plug into the electrical supply until the assembly is complete. Failure to do so could result in electrical shock or injury. Before assembling the vacuum cleaner, check the PACKING LIST on the cover of the separate REPAIR PARTS LIST. Use this list to verify that you have received all the components of your new Kenmore vacuum cleaner. HANDLE ASSEMBLY Remove the combination brush from the handle to expose the handle mounting hole. Remove the handle screw from the body of the vacuum. Position the handle assembly as shown in the illustration below. When installing the handle, firmly press the handle onto the body. Secure with handle screw provided. Begin to tighten the screw with your fingers. It may be necessary to adjust the handle slightly. Using a screwdriver, tighten handle screw. Reinstall combination brush. CAUTION Do not overtighten. Overtightening could strip the screw holes. Do not operate the cleaner without the screw in place. CORD ASSEMBLY Make sure the quick release upper cord hook is in the upright position. Remove the wire tie from the power cord. Make sure the power cord is placed into the locking notch on the body as shown. This helps keep the power cord out from under the vacuum cleaner agitator. Notch Power lug Wrap the power cord around the quick release cord hook and the carrying handle. Lock the power cord plug onto the power cord.
-
 1
1 -
 2
2 -
 3
3 -
 4
4 -
 5
5 -
 6
6 -
 7
7 -
 8
8 -
 9
9 -
 10
10 -
 11
11 -
12
-
13
-
14
-
15
-
16
-
17
-
18
-
19
-
20
-
21
-
22
-
23
-
24
-
25
-
26
-
27
-
28
-
29
-
30
-
31
-
32
-
33
-
34
-
35
-
36
-
37
-
38
-
39
-
40
-
41
-
42
 |
 |
