Kenmore 37115 Owners Manual - Page 7
Warning, Handle, Assembly, Caution, Extension, Crevice, Placement
 |
View all Kenmore 37115 manuals
Add to My Manuals
Save this manual to your list of manuals |
Page 7 highlights
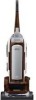
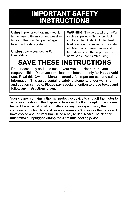
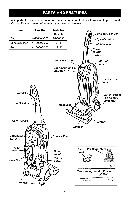
Please pay special attention to these hazard alert boxes, and follow any instructions given. WARNING statements alert you to such dangers as fire, electric shock, burns and personal injury, CAUTION statements alert you to such dangerous personal injury and/or property damage. WARNING Electrical Shock Hazard Do not plug into the electrical supply until the assembly is complete. Failure to do so could result in electrical shock or injury. Before assembling the vacuum cleaner, check the PACKING LIST on the cover of the separate REPAIR PARTS LIST or on the carton. Use this list to verify that you have received all the components of your new Kenmore vacuum cleaner, HANDLE ASSEMBLY 1. Attach upper handle to main body of cleaner. CAUTION Do not overtighten. Overtightening screw holes. could strip the Do not operate the vacuum cleaner without the screws in place. EXTENSION WAND/ CREVICE TOOL PLACEMENT Place the telescoping wand (A) into the wand holder on the left side of the vacuum cleaner. Place the crevice tool (B) in the crevice tool holder on the right side of the vacuum cleaner. A 2. Push handle plug onto the front of cleaner, Insert the one (1) screw into the back of the handle and tighten, making sure the handle plug is secure.
-
 1
1 -
 2
2 -
 3
3 -
 4
4 -
 5
5 -
 6
6 -
 7
7 -
 8
8 -
 9
9 -
 10
10 -
 11
11 -
 12
12 -
13
-
14
-
15
-
16
-
17
-
18
-
19
-
20
-
21
-
22
-
23
-
24
-
25
-
26
-
27
-
28
-
29
-
30
-
31
-
32
-
33
-
34
-
35
-
36
-
37
-
38
-
39
-
40
-
41
-
42
-
43
-
44
-
45
-
46
-
47
-
48
-
49
 |
 |
