Kenmore 4156 Use and Care Guide - Page 8
ConnectingThe Ice MakerTo Your WaterSupply
 |
View all Kenmore 4156 manuals
Add to My Manuals
Save this manual to your list of manuals |
Page 8 highlights
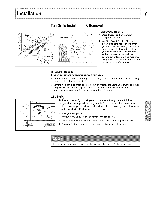
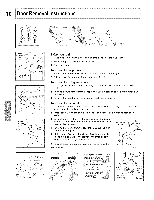
8 ConnectingThe Ice MakerTo Your WaterSupply To avoidelectricshock,whichcan causedeathor severepersonalinjury,disconnectthe refrigeratofrrom electricalpowerbeforeconnectinga watersupply lineto the refrigerator. To AvoidPropertyDamage: • Coppertubingis recommendedfor the water supplyline.Watersupplytubingmaded ¼" plasticis not recommendedsince it greatlyincreasesthe potentialfor water leaks. Manufacturewr ill notbe responsible for anydamageif plastictubingis usedfor supplyline. • DO NOT installwater supplytubingin areaswheretemperaturesfall belowfreezing. • Chemicalsfrom a malfunctioningsoftenercan damagethe icemaker.If the ice makeris connectedto soft water,ensurethat thesofteneris maintainedand workingproperly. Ensurethatyourwater supplyline connectionscomplywith all localplumbingcodes. Before installing the water supply line, you will need: • Basic Tools: Adjustable wrench, flat-blade screwdriver, and Phillips TM screwdriver. ,, Access to a household cold water line with water pressure between 20 and 100 psi. • A water supply line made of 4¼inch (6.4 mm) OD, copper tubing. To determine the length of copper tubing needed, you will need to measure the distance from the ice maker inlet valve at the back of the refrigerator to your cold water pipe. Then add approximately 7 feet (2.1 meters), so the refrigerator can be moved out for cleaning (as shown). ,, A shutoff valve to connect the water supply line to your household water system. DO NOT use a self-piercing type shutoff valve. • A compression nut and ferrule (sleeve) for connecting the water supply line to the ice maker inlet valve. A water line kit is availablefrom your appliancedealerat additionalcost. It contains25 feet (7.6meters)of ¼ inchOD coppertubing,a saddletype shutoffvalve (non-piercing)(,2) ¼ inchbrasscompressionnuts,(2) ferrules/sleevesa, nd instructionsfor installinga water supply line.
-
 1
1 -
2
-
 3
3 -
 4
4 -
 5
5 -
 6
6 -
 7
7 -
 8
8 -
 9
9 -
 10
10 -
 11
11 -
 12
12 -
 13
13 -
14
-
15
-
16
-
17
-
18
-
19
-
20
-
21
-
22
-
23
-
24
-
25
-
26
-
27
-
28
-
29
-
30
-
31
-
32
-
33
 |
 |