Kenmore 4803 Installation Instructions
Kenmore 4803 - Elite 30 in. Wall Oven Manual
 |
View all Kenmore 4803 manuals
Add to My Manuals
Save this manual to your list of manuals |
Kenmore 4803 manual content summary:
- Kenmore 4803 | Installation Instructions - Page 1
FOR LOCAL ELECTRICAL iNSPECTOR'S USE. READ AND SAVE THESE iNSTRUCTiONS FOR FUTURE REFERENCE. FOR YOUR SAFETY: Do not store or use gasoline or other flammable vapors and liquids in the vicinity of this or any other appliance. Your new wall oven has been designed to fit a limited variety of cutout - Kenmore 4803 | Installation Instructions - Page 2
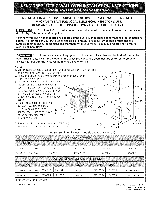
. The oven must be centered to prevent excess heat buildup that may result in heat damage or fire. 1" (2,5cm) Min, i]/i@iiii " B %. Door Operi (seenote 2) ! _--Spacer 3" (7.6 cm) Max. 2"(5 cm) WideWoodSpacerif Needed Junction Box NOTES: 1. Base must be capable of supporting 300 pounds - Kenmore 4803 | Installation Instructions - Page 3
INSTRUCTION NOTE: Wire sizes and connections must conform with • Be sure your wall oven is installed and grounded the fuse size and rating of the appliance in accordance with the American National Electrical Code ANSI/NFPA properly by a qualified installer or service oven. The oven support - Kenmore 4803 | Installation Instructions - Page 4
Electrical Code ANSI/NFPA No. 70-latest edition, or with CSA Standard C22.1, Canadian Electrical Code, Part 1, and local codes and ordinances 's recommended procedure closely. You may not ground the oven through the neutral (white) wire if oven is used in a new branch circuit installation (1996 - Kenmore 4803 | Installation Instructions - Page 5
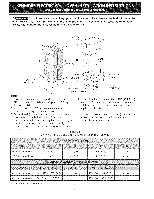
attached to the cabinet and the appliance to prevent tipping of the wall oven and injury to persons. Mounting Brackets Installation Instructions 1. Unpack the wall oven. Remove the bottom trim taped on the oven side panel. Find the 2 mounting brackets and screws included in the literature package - Kenmore 4803 | Installation Instructions - Page 6
the side of cabinet. To pull out the oven for servicing you must use the two tools supplied with the oven. Insert one tool into hole in each side of oven frame. Holes are visible when door is opened. After inserting tools pull the oven towards you (see Figure 7). 5. Bottom Trim Installation: (Note - Kenmore 4803 | Installation Instructions - Page 7
installation instructions for the dimensions). To reduce the risk of personal injury and tipping of the wall oven, the wall oven Volt junction I for built-in oven. Use 3/4" (1.9 cm) plywood, installed on two runners, flush with toe plate. Basemust be capable of supporting 150 pounds (68 kg) for - Kenmore 4803 | Installation Instructions - Page 8
and the convection fan will run. The convection fan will stop running when the oven door is opened. Before You Call for Service Read the Before You Call for Service Checklist and operating instructions in your Use and Care Guide. It may save you time and expense. The list includes common occurrences - Kenmore 4803 | Installation Instructions - Page 9
LA INSTALACION Y EL SERVICIO DEBEN SER EFECTUADOS POP, UN INSTALADOR CAUFICADO. IMPORTANTE: GUARDE ESTAS INSTRUCCIONES PARA USO DEL iNSPECTOR LOCAL DE ELECTRICIDAD. LEA Y GUARDE ESTAS INSTRUCCIONES PARA REFERENCIA FUTURA. PARA SU SEGURIDAD: No alrnanece ni utilice gasolina u otros vapores y liquidos - Kenmore 4803 | Installation Instructions - Page 10
No quite los separadores de los muros laterales o/y de la parte posterior del homo empotrado. Estos espadadores centran el homo en el espado provisto. El homo debe estar centrado para prevenir una concentraci6n excesiva de calor que podria resultar en da_os pot el calor o un incendio. 1" (2,5cm) - Kenmore 4803 | Installation Instructions - Page 11
. Nota importante ai consumidor Conserve estas instrucciones y el manual del usuario para referencia futura. INSTRUCCIONES IIVlPORTANTES DE SEGURIDAD ultirna edicion en los Estados Unidos, o el C6digo Electrico Canadiense CSA Standard C22.1, Part 1, en Canada. Pisar, apoyarse, o sentarse sobre la - Kenmore 4803 | Installation Instructions - Page 12
y est,1 conforme con el Codigo Electrico Nacional ANSI/ NFPA No. 70-01tima ediciOn en los Estados Unidos, o el Codigo Electrico Canadiense CSA Standard C22.1, Part 1, en Canada1. En este electrodomestico toma a tierra, se necesita un cable de Este electrodomestico viene equipado con un cable de - Kenmore 4803 | Installation Instructions - Page 13
NO conecte el alambre puesto a tierra a una tuberfa de suministro de gas. NO conecte el suministro de energfa electrica hasta que el electrodomestico haya sido permanentemente puesto a tierra. Conecte el alambre de puesto a tierra antes de enchufar pot primera vez el electrodomestico. Si est_ - Kenmore 4803 | Installation Instructions - Page 14
No levante el hornIMo POpoRrTAlaNTmEanija de la puerta. 3. Insertar el homo en la abertura del gabinete. Deslizar el homo hacia dentro dejando 11/2"(3,8 cm) de espacio libre entre el homo y la parte delantera del gabinete (ver la Figura 6). Empujar el cable blindado a trav_s del orificio del - Kenmore 4803 | Installation Instructions - Page 15
6. Para una instalacion tfpica de un horno electrico incorporado debajo del mostrador, ve_ise la figura 8. S61o ciertos modelos de tapas de cocina se pueden instalar sobre ciertos modelos de hornos electricos empotrados. Las tapas de cocina y los hornos empotrados se mencionan pot su n0mero de - Kenmore 4803 | Installation Instructions - Page 16
del homo durante el horneado o asado pot conveccion. Antes de ilamar al servicio Lea la seccion Lista de Antes de Ilamar en su Manual del Usuario. Estole podr_i ahorrar tiempoygastos. Esta lista incluye ocurrencias comunes que no son el resultado de defectos de materiales o fabricacion de este
-
 1
1 -
 2
2 -
 3
3 -
 4
4 -
 5
5 -
 6
6 -
 7
7 -
8
-
9
-
10
-
11
-
12
-
13
-
14
-
15
-
16
 |
 |
iNSTALLATiON
AND
SERVICE
MUST
BE
PERFORMED
BY A
QUALiFiED
iNSTALLER.
iMPORTANT:
SAVE FOR
LOCAL
ELECTRICAL iNSPECTOR'S
USE.
READ
AND
SAVE
THESE
iNSTRUCTiONS
FOR FUTURE
REFERENCE.
FOR YOUR SAFETY: Do not store
or use gasoline
or other
flammable
vapors
and liquids
in
the vicinity
of this or any other
appliance.
Your
new wall
oven
has been designed
to fit
a limited
variety
of cutout
sizes to
make the
job
of
installing
easier.
The
first
step of your
installation
should
be to measure
your
current
cutout
dimensions
and
compare
them
to the cutout
dimensions
chart
below
for
your
model.
You may find
little
or no cabinet
work
being
necessary.
Do not
remove
spacers
(if
equipped)
on the side walls
and/or
on the
back of
the built=in
oven.
These
spacers center
the oven
in
the space
provided.
The
oven
must
be centered
to
prevent
excess heat buildup
that
may
result
in
heat damage
or fire.
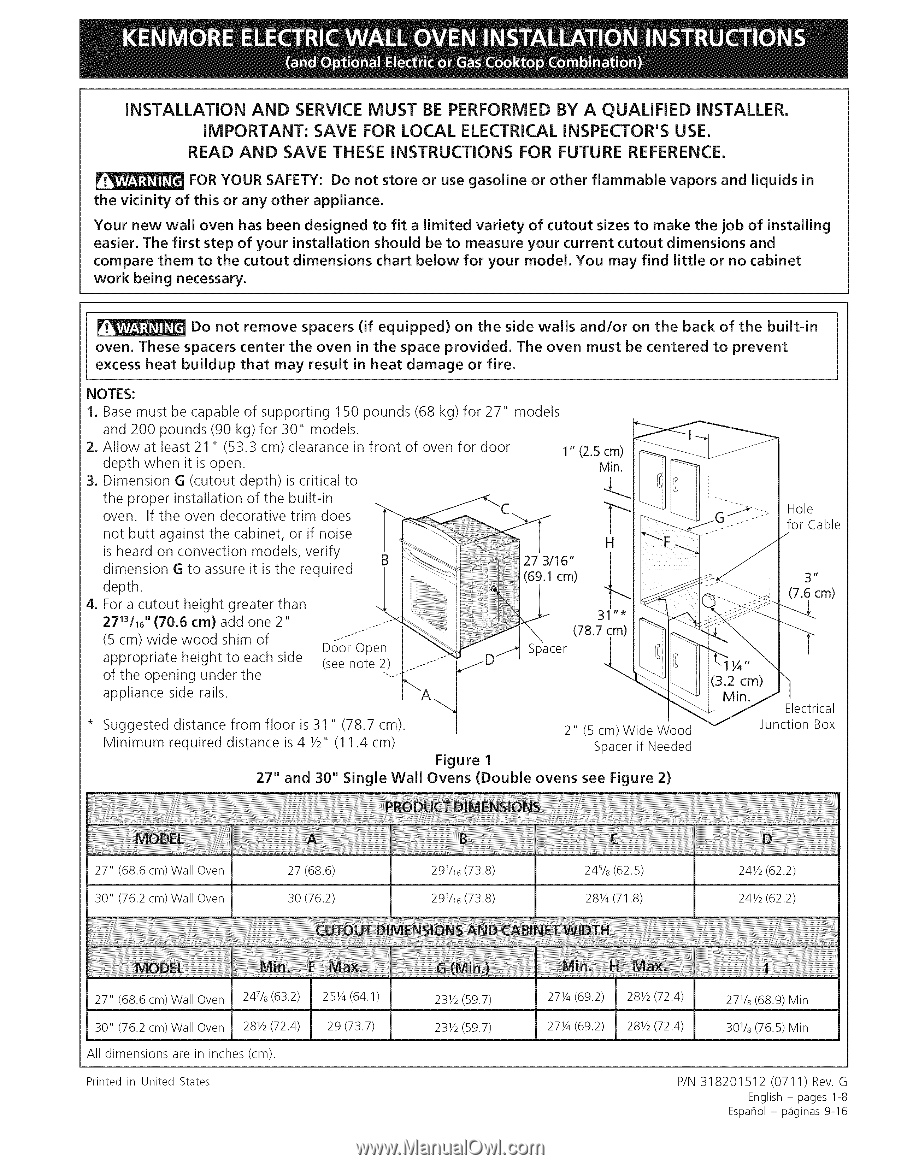
NOTES:
1. Base must be capable of supporting
150 pounds (68 kg) for 27" models
and 200 pounds (90 kg) for 30"
models•
2. Allow
at least 21 " (53.3 cm) clearance in front
of oven for door
depth when it is open.
3. Dimension
G (cutout depth) is critical to
1" (2.5cm) ___
Min.
the proper installation
of the built-in
•
•
_
C
"_"_
_
--_,---
Hole
oven.
If the oven decorative trim does
'
---
>..
_,<-J-
TOr
L.aDle
not butt against the cabinet
or if noise
l
,.
_F_:_
:
.......
I
/
is heard on convection
models
verify
B
_
.....
'
,
273/16"
I
/
dimension G _o assure i_ is _ne required
_:_
t69 1cm_
_
,
-
.....
_
:::::
\
,
/
:__
.
I
depth.
.
...............
J_---
__--
.........
i
(7.6 cm)
4. For a cutout he ght greater than
,_
/
/
-<<_]
<J2
':_z_-_--_
I
27W_6" (70 6 cm) add one 2"
>< \\\
,,
31
,
_
_.¢_:-_
_
(5 cm) wide wood shim of
Do:[-"_i_
enortJ
-_"_
_ua_cer (78,7 _m)_,
<
<.
\
--r
appropr ate he ght to each s de
(seenotPe2'
_Y_
_D/
p
|
[_ (_
"--1]_,/,,_
/
of the opening under the
......
_
_'_C_
<
(3.2 cm)
"/
appliance side rails.
A,
__
Min,//
_q
/
Electrical
•
"
v
Junction Box
Suggested distance from floor
is 31
(78.7 cm).
2" (5 cm) Wide Wood
Minimum
required distance is 4 1/2" (11.4 cm)
Spacerif Needed
Figure
1
27" and 30" Single
Wall
Ovens
(Double
ovens
see Figure
2)
27"
(68.6 cm) Wall Oven
27 (68.6)
29%6 (73.8)
24% (62.5)
24F2 (62.2)
30"
(76.2 cm) Wall Oven
30 (76.2)
29%6 (73.8)
28_A (71.8)
24F2 (62.2)
27"
(68.6 cm) Wall Oven
247/8 (63.2)
25Y4 (64.1)
23V2 (59.7)
27Y4 (69.2)
28V2 (72.4)
27_h (68.9) Min
30"
(76.2 cm) Wall Oven
28V2 (72.4)
29 (73.7)
23V2 (59.7)
27Y4 (69.2)
28V2 (72.4)
30V8 (76.5) Min
All
dimensions
are in inches
(cm).
Printed in United
States
P/N 318201512
(0711)
Rev. G
English - pages 1-8
Espahol -
p_iginas 9-16