Kenmore 4803 Installation Instructions - Page 5
Cabinet, Installation
 |
View all Kenmore 4803 manuals
Add to My Manuals
Save this manual to your list of manuals |
Page 5 highlights
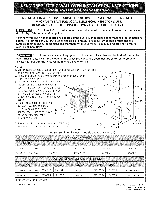
NOTE TO ELECTRICIAN: The armored cable leads supplied with the appliance are UL-recognized for connection to larger gauge household wiring. The insulation of the leads is rated at temperatures much higher than temperature rating of household wiring. The current carrying capacity of the conductor is governed by the temperature rating of the insulation around the wire, rather than the wire gauge alone. Model and Serial Number Location The serial plate is located along the interior side trim of the oven and visible when the door is opened. When ordering parts for or making inquires about your oven, always be sure to include the model and serial numbers and a lot number or letter from the serial plate on your oven. 5. Cabinet Installation _The wall oven can tip when the door is open. The mounting brackets supplied with the wall oven must be attached to the cabinet and the appliance to prevent tipping of the wall oven and injury to persons. Mounting Brackets Installation Instructions 1. Unpack the wall oven. Remove the bottom trim taped on the oven side panel. Find the 2 mounting brackets and screws included in the literature package. 2. Install the mounting brackets in the wall cabinet as shown on Figure 5. Note: To prevent damage to cabinet, it is recommended to drill 1/16" (0.16 cm) dia. pilot holes before installing the mounting brackets. _F see figure 1_ kX, Single Wall Oven Serial Plate Location Double Wall Oven Serial Plate Location Heavy Weight Hazard Use 2 or more people to move and install wall oven. Failure to follow this instruction can result in injury or damage to the unit. Mounting 22 3/16" * (56.4 cm) Brackets _H see figure 1 Single Wall ovens L_F see figure 2_ kk" I Mounting 43 5/8" * (110.8 cm) Brackets I T _H see figure 2 Double Wall ovens • If wood shims are installed please calculate this dimension from the top of the shim to the middle of the mounting bracket. Figure 5
-
 1
1 -
 2
2 -
 3
3 -
 4
4 -
 5
5 -
 6
6 -
 7
7 -
 8
8 -
 9
9 -
 10
10 -
 11
11 -
12
-
13
-
14
-
15
-
16
 |
 |
