Kenmore 4803 Installation Instructions - Page 6
Trim Installation
 |
View all Kenmore 4803 manuals
Add to My Manuals
Save this manual to your list of manuals |
Page 6 highlights
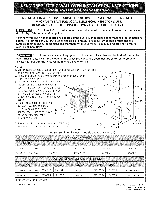
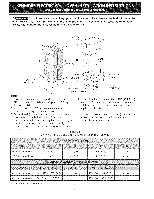
i Do not lift theIMoPvOenRTbAyNtThe door handle. i 3. Insert the oven into the cabinet opening. Slide oven inward leaving 11/2"(3.8 cm) clearance between the oven and front of cabinet (see Figure 6). Pull the armored cable through the hole for it in the cabinet and toward the junction box while moving the appliance inward. f Mounting !/ bracketinstalled in cabinet Oven side -. trim _• / Oven Cabinet Right Side Tool supplied Mounting bracket released I Oven removed from the cabinet 1Y2" (3.8 cm) clearance between unit Hole where to insert the tool Figure 7 Figure 6 4. Pushthe oven in and against the cabinet; the oven side bracket will clip into the mounting bracket installed into the side of cabinet. To pull out the oven for servicing you must use the two tools supplied with the oven. Insert one tool into hole in each side of oven frame. Holes are visible when door is opened. After inserting tools pull the oven towards you (see Figure 7). 5. Bottom Trim Installation: (Note for the double wall ovens only: If the cutout height is between 51W1J' (131.6 cm) and 511s/1J' (131.9 cm) use the larger bottom trim.) Placethe top of the bottom trim over the side trim tabs on each side of the oven below the oven door and fix it using the 2 screws supplied in the mounting holes located on each side trim below the oven frame (see figure 8). 6 Screws --Bottom Trim Figure 8
-
 1
1 -
 2
2 -
 3
3 -
 4
4 -
 5
5 -
 6
6 -
 7
7 -
 8
8 -
 9
9 -
 10
10 -
 11
11 -
 12
12 -
13
-
14
-
15
-
16
 |
 |
