Kenmore 5890 Use and Care Guide - Page 14
©r spe -a sdCovers
 |
View all Kenmore 5890 manuals
Add to My Manuals
Save this manual to your list of manuals |
Page 14 highlights
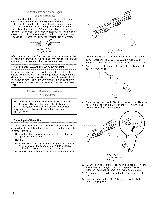
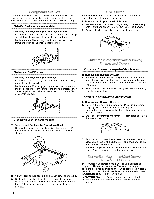
Your model may have glass or wire shelves. Store similar foods together and adjust the shelves to fit different heights. This reduces the time the refrigerator door is open and saves energy. Slide-Out Shelves (on some models) To Remove and Replace a Shelf in a Metal Frame: 1. Pull the shelf forward to the stop. Tilt the front of the shelf up and lift it slightly as you pull the shelf from the frame. 2. Replace the shelf by guiding it back into the slots on the frame and pushing the shelf in past the stop. The deli drawer stores raisins, nuts, spreads, and other small items at normal refrigerator temperatures. To Remove and Replace the Deli Drawer: 1. Remove the deli drawer by sliding it straight out to the stop. Lift the front and slide the drawer out the rest of the way. 2. Replace the deli drawer by sliding it back past the stop. Shelves and Shelf Frames To Remove and Replace a Shelf/Frame: 1. Remove the shelf/frame by tilting it up at the front and lifting it out of the shelf supports. 2. Replace the shelf/frame by guiding the rear shelf hooks into the shelf supports. Tilt the front of the shelf up until rear shelf hooks drop into the shelf supports. Check that the shelf is securely in position. Drop-Down Shelf (on some models) To Remove and Replace the Drop-down Shelf: 1. Remove the drop-down shelf by sliding it up and back. Pull forward slightly to release the rear pegs from the track as shown. ©r spe -a sdCovers Crisper and Convertible Vegetable/Meat Drawers To Remove and Replace Drawers: 1. Slide crisper or meat drawer straight out to the stop. Lift the front of drawer with one hand while supporting the bottom of drawer with the other hand and slide the drawer out the rest of the way. 2. Replace the crisper or meat drawer by sliding it back in fully past the drawer stop. Crisper or Vegetable/Meat Drawer Covers To Remove and Replace Covers: 1. Remove the crisper and meat drawer. Press up in center of crisper glass insert until it rises above the plastic frame. Holding the crisper glass firmly, slowly slide the glass insert forward to remove. 2. Lift crisper cover frame and remove. Repeat steps to remove the meat drawer cover. 3. Replace back of meat drawer cover frame into supports or slides on side walls of the refrigerator and lower or slide the front of the cover frame into place. 4. Slide rear of glass insert into cover frame and lower front into place. Repeat steps to replace the crisper cover. 2. With the rear pegs released, pull the shelf down and forward. 3. Replace the shelf by sliding the front pegs into the track. Push the shelf up and back until the rear pegs drop into the track. Pull down and forward to be sure the shelf is securely in place. 14 .........u Y,,,£0_O The convertible vegetable/meat drawer can be adjusted to properly chill meats or vegetables. The air inside the pan is cooled to avoid "spot" freezing and can be set to keep meats at the National Livestock and Meat Board recommended storage temperatures of 28 ° to 32°F (-2 ° to 0°C). IMPORTANT: To extend freshness, wrap meats in airtight, moisture-proof materials before storing. Always store meat as recommended.
-
 1
1 -
2
-
3
-
4
-
5
-
6
-
7
-
8
-
 9
9 -
 10
10 -
 11
11 -
 12
12 -
 13
13 -
 14
14 -
 15
15 -
 16
16 -
 17
17 -
 18
18 -
 19
19 -
20
-
21
-
22
-
23
-
24
-
25
-
26
-
27
-
28
-
29
-
30
-
31
-
32
-
33
-
34
-
35
-
36
-
37
-
38
-
39
-
40
-
41
-
42
-
43
-
44
-
45
-
46
-
47
-
48
-
49
-
50
-
51
-
52
-
53
-
54
-
55
-
56
-
57
-
58
-
59
-
60
-
61
-
62
-
63
-
64
-
65
-
66
-
67
-
68
-
69
-
70
-
71
-
72
-
73
-
74
-
75
-
76
 |
 |