Kenmore 7952 Use and Care Guide - Page 14
Setting, the Clock
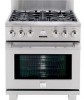 |
View all Kenmore 7952 manuals
Add to My Manuals
Save this manual to your list of manuals |
Page 14 highlights
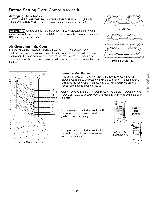
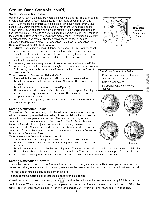
Control Button Features READ THE iNSTRUCTiONS CAREFULLY BEFORE USING THE OVEN. For satisfactory use of your oven, become familiar with the various features and functions of the oven as described below. Detailed instructions for each feature and function follow later in this Use & Care Guide. OVEN TEMPERATURE CONTROL KNOB-- Use to SELECTOR CONTROL KNOB- Use to select the Bread Proof, Warm & Hold, Bake, Convection Bake, Convection Roast, Broil or Clean Feature. select the Bread Proof, Warm & Hold, or the required Bake, Convection Bake, Convection Broil or Clean Temperature. Roast, CLEAN-Used to select the SelfCleanim cycle. BROIL-Used to select broil BREAD PROOF-- Used to set the Bread Proof feature. I INDICATOR -- This indicator shows the current set temperature OinVthEeNoTvEeMn.PERATURE SCROLL PADS-Used to scroll up or down for many functions. CONVECTION ROAST-- Used to select the convection roasting mode. CONVECTION BAKE-- Used to select the Convection Bake feature. BAKE-- Used to select the bake function. D OVEN INTERIOR LIGHT PAD-- ..... used 1:0]:urn oven interior light ON and OFF. I Im L.-;LUL;._....._. =1 HAU-- used m 1:0se1: 1:ne1:line of day. | PROBE PAD-- Used to set the ._...'roDe[ea[ure. TIMER PAD-- Used to set or cancel the minute timer. The minute timer does not start or stop cooking. _CONVECTION CONVERT-- Used to select the Convection Convert feature. Setting the Clock Clo_k The button is used to set the clock. Until the clock is set, all the other oven functions will not be available. The clock may be set for 12 or 24 hour time of day operation. The clock has been preset at the factory for the 12 hour operation. When the range is first plugged in, or when the power supply to the appliance has been interrupted, the display will flash with "PF" (Power Failure). Clo_k When PF flashes in the display, press the button. No other button will stop the time from flashing. To set the clock ('loc_ 1. Press the Eli button. The control will beep once and the time of day will appear in the display. 2. To set the clock to the current time of day, press the or button to increase or decrease the time of day in 1 minute increments, or keep the increments. or button pressed to increase or decrease the time of day in 10 minute 3. Release the button when the desired time is reached. Wait 5 seconds and the change will be accepted. Changing between 12 or 24 hour time of day display Clock 1. Press and hold the I_'_t button for6 seconds. The display will show either"12" (for 12 hour clock)or"24" clock). 2. Press the or button to switch between the 12 and 24 hour time of day display. 3. Wait 5 seconds to accept the change. (for24 hour 14
-
 1
1 -
2
-
3
-
4
-
5
-
6
-
7
-
8
-
 9
9 -
 10
10 -
 11
11 -
 12
12 -
 13
13 -
 14
14 -
 15
15 -
 16
16 -
 17
17 -
 18
18 -
 19
19 -
20
-
21
-
22
-
23
-
24
-
25
-
26
-
27
-
28
-
29
-
30
 |
 |
