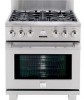
Kenmore 7952 Use and Care Guide - Page 23
General, Care & Cleaning, cont'd
 |
View all Kenmore 7952 manuals
Add to My Manuals
Save this manual to your list of manuals |
Page 23 highlights
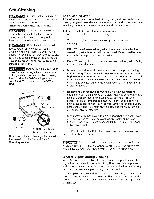
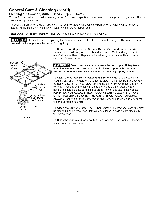
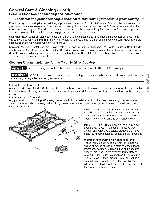
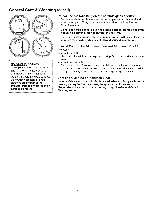
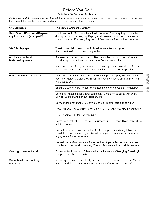
General Care & Cleaning (cont'd) Care and Cleaning of Stainless Steel This model is equipped with stainless steel exterior parts. Special care and cleaning are required for maintaining the appearance of stainless parts. Please refer to the table provided at the beginning of the General Care & Cleaning section in this Use & Care Guide. Lock in normal position Figure I Lock engaged for door removal Figure 2 Removing and Replacing the Oven Door The door is heavy. For safe, temporary storage, lay the door fiat with the inside of the door facing down. To Remove Oven Door: 1. Open the door to the fully opened position. 2. Pull up the lock located on both hinge levers to door removal position (Figure 2). 3. Grab the door by the sides and pull the bottom of the door up and toward you to disengage the hinge levers from the hinge slots. Keep pulling the bottom of the door toward you while rotating the top of the door toward the range to completely disengage the hinge levers (Figure 3). 4. To clean oven door, follow the instructions provided in the General Care & Cleaning table. To Replace Oven Door: 1. Grab the door by the sides by holding as close to the hinge as possible. 2. Carefully place the hinge levers into the hinge slots by taking care not to chip the porcelain. 3. Open the door to the fully opened position. 4. Engage the lock on both hinge levers to normal position (Figure 1). Note: Make sure the hinge levers are fully inserted into hinge slots before locking them. 5. Close the oven door. ii:i,_il _:, Door removed from the oven Figure 3 Lift up and pull out. Halogen ht Bulb Special Door Care Instructions Oven doors contain glass that can break. Read the following recommendations: 1. Do not close the oven door until all the oven racks are fully in place. 2. Do not hit the glass with pots, pans, or any other object. 3. Scratching, hitting, jarring or stressing the glass may weaken its structure causing an increased risk of breakage at a later time. Changing the Oven Light The oven lights will automatically turn ON when the oven door is opened. The oven lights may also be manually operated by pressing the pad. The oven light bulb is covered with a glass shield. The glass shield can be removed to be cleaned manually or to change oven light. THIS GLASS SHIELD MUST BE IN PLACE WHENEVER THE OVEN IS IN USE. To replace the light bulb: CAUTION: BE SURE THE OVEN IS COOL. 1. Turn the power off at the main source. 2. Wear a leather-faced glove for protection against possible broken glass. 3. To remove the glass shield, lift up on side with gloved finger and use force to pull shield out. 4. Replace halogen light appliance bulb taking care not to touch the bulb with your bare fingers. Touching bulb with your skin can leave a film on the bulb that causes it to burn out quickly. 5. Replace glass shield in opposite order and manner of removal. Figure 4 23
-
 1
1 -
2
-
3
-
4
-
5
-
6
-
7
-
8
-
9
-
10
-
11
-
12
-
13
-
14
-
15
-
16
-
17
-
 18
18 -
 19
19 -
 20
20 -
 21
21 -
 22
22 -
 23
23 -
 24
24 -
 25
25 -
 26
26 -
 27
27 -
 28
28 -
29
-
30
 |
 |
