Kenmore 7952 Use and Care Guide - Page 19
Setting, the Warm, Feature, Broil, Broiling, Times, Searing, Grill
 |
View all Kenmore 7952 manuals
Add to My Manuals
Save this manual to your list of manuals |
Page 19 highlights
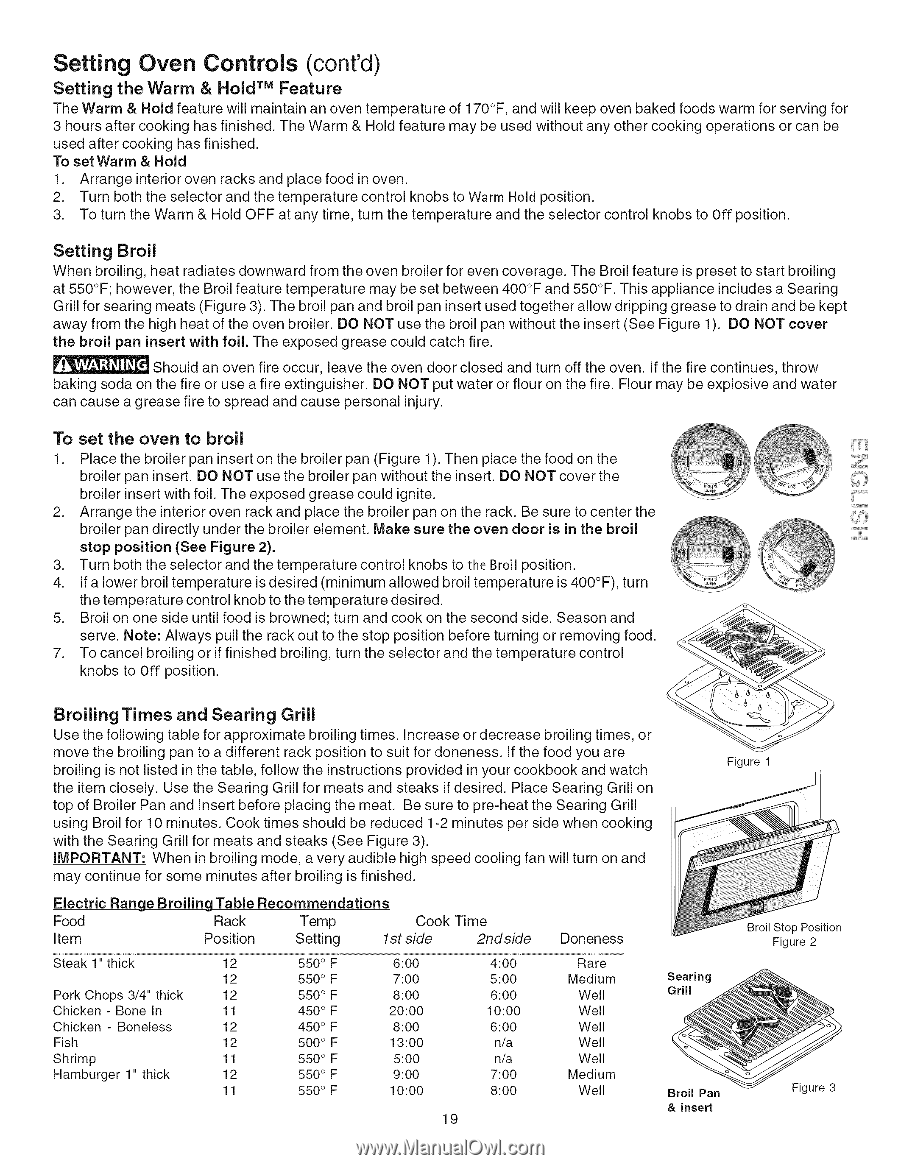
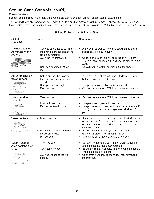
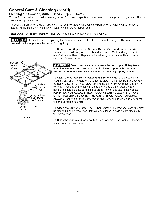
Setting Oven Controls (cont'd) Setting the Warm & Hold TM Feature The Warm & Hold feature will maintain an oven temperature of 170°F, and will keep oven baked foods warm for serving for 3 hours after cooking has finished. The Warm & Hold feature may be used without any other cooking operations or can be used after cooking has finished. To set Warm & Hold 1. Arrange interior oven racks and place food in oven. 2. Turn both the selector and the temperature control knobs to Warm Hold position. 3. To turn the Warm & Hold OFF at any time, turn the temperature and the selector control knobs to Off position. Setting Broil When broiling, heat radiates downward from the oven broiler for even coverage. The Broil feature is preset to start broiling at 550°F; however, the Broil feature temperature may be set between 400°F and 550°F. This appliance includes a Searing Grill for searing meats (Figure 3). The broil pan and broil pan insert used together allow dripping grease to drain and be kept away from the high heat of the oven broiler. DO NOT use the broil pan without the insert (See Figure 1). DO NOT cover the broil pan insert with foil. The exposed grease could catch fire. Should an oven fire occur, leave the oven door closed and turn off the oven. If the fire continues, throw baking soda on the fire or use a fire extinguisher. DO NOT put water or flour on the fire. Flour may be explosive and water can cause a grease fire to spread and cause personal injury. To set the oven to broil 1. Place the broiler pan insert on the broiler pan (Figure 1). Then place the food on the broiler pan insert. DO NOT use the broiler pan without the insert. DO NOT cover the broiler insert with foil. The exposed grease could ignite. 2. Arrange the interior oven rack and place the broiler pan on the rack. Be sure to center the broiler pan directly under the broiler element. Make sure the oven door is in the broil stop position (See Figure 2). 3. Turn both the selector and the temperature control knobs to the Broil position. 4. ifa lower broil temperature is desired (minimum allowed broil temperature is 400°F), turn the temperature control knob to the temperature desired. 5. Broil on one side until food is browned; turn and cook on the second side. Season and serve. Note: Always pull the rack out to the stop position before turning or removing food. 7. To cancel broiling or if finished broiling, turn the selector and the temperature control knobs to Off position. Broiling Times and Searing Grill Use the following table for approximate broiling times. Increase or decrease broiling times, or move the broiling pan to a different rack position to suit for doneness. If the food you are broiling is not listed in the table, follow the instructions provided in your cookbook and watch the item closely. Use the Searing Grill for meats and steaks if desired. Place Searing Grill on top of Broiler Pan and Insert before placing the meat. Be sure to pre-heat the Searing Grill using Broil for 10 minutes. Cook times should be reduced 1-2 minutes per side when cooking with the Searing Grill for meats and steaks (See Figure 3). IMPORTANT: When in broiling mode, a very audible high speed cooling fan will turn on and may continue for some minutes after broiling is finished. Figure 1 Electric Range Broiling Table Recommendations Food Rack Temp item Position Setting Steak 1" thick 12 12 Pork Chops 3/4" thick 12 Chicken - Bone In 11 Chicken - Boneless 12 Fish 12 Shrimp 11 Hamburger 1" thick 12 11 550 ° F 550 ° F 550 ° F 450 ° F 450 ° F 500 ° F 550 ° F 550°F 550 ° F Cook Time 1st side 2ndside 6:00 7:00 8:00 20:00 8:00 13:00 5:00 9:00 10:00 4:00 5:00 6:00 10:00 6:00 n/a n/a 7:00 8:00 19 Doneness Rare Medium Well Well Well Well Well Medium Well Searing Grill Broil Stop Position Figure 2 Broil Pan & insert Figure 3
-
 1
1 -
2
-
3
-
4
-
5
-
6
-
7
-
8
-
9
-
10
-
11
-
12
-
13
-
 14
14 -
 15
15 -
 16
16 -
 17
17 -
 18
18 -
 19
19 -
 20
20 -
 21
21 -
 22
22 -
 23
23 -
 24
24 -
25
-
26
-
27
-
28
-
29
-
30
 |
 |