Kenmore SI3209ZA Use and Care Guide - Page 12
Assemble, Island,
 |
View all Kenmore SI3209ZA manuals
Add to My Manuals
Save this manual to your list of manuals |
Page 12 highlights
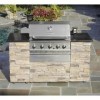
Assemble Island Set [] Open both cartons and remove alI packing materials. [] Open Grill Lid and Refrigerator door and remove packing materials. [] Align the 3 individual components and slide together as shown. [] Be sure to attach the Regulator with Hose to both the Grill and the Side Burner before securely placing the island in position. (Please refer to Step 2.) Note: All measurements are in inches Table top surface Use your grill at least 3 feet away from any wall or surface. Do not obstruct the flow of air for combustion and ventilation. DO NOT lift Grill Island units from the table top surfaces when moving or assembling Island set. Install Regulator with Hose to Grill and Griddle Side Burner "H [] Unscrew the Bowl Rear Upper Panel from Bowl Rear Panel (Fig.l) then insert the connection hose through the hole on the cart right panel of the main grill and then through the hole on the cart left panel of the griddle side grill. (see Fig. 2). [] Insert the electric wire set through the cart left panel of the griddle side grill and then push plug to the socket of the electric wire, ensure the same color match (Fig. 3). [] Unscrew the Hose Holder from the Rear Cart Frame.Then fix the hose by Hose Holder onto the Rear Cart Frame (Fig. 3). [] Push back Sleeve of the Socket. See Figure A. Insert Plug then release Sleeve. See Figure B. Push Plug until sleeve snaps forward locking the Plug into the Socket. See Figure C. [] Complete installation of Regulator with Hose for both Grill and Side Burner Plugs. ...•. Plug Fig. 1 Figure A PLUG_ SOCKET ......... / ',\ . \\\\ \,,\ Figure B ,SLEEVE / / Figure C \\ SLEEVE \ 12 Fig. 2 hose hose holder
-
 1
1 -
2
-
3
-
4
-
5
-
6
-
 7
7 -
 8
8 -
 9
9 -
 10
10 -
 11
11 -
 12
12 -
 13
13 -
 14
14 -
 15
15 -
 16
16 -
 17
17 -
18
-
19
-
20
-
21
-
22
-
23
-
24
-
25
-
26
-
27
-
28
-
29
-
30
-
31
-
32
-
33
-
34
-
35
-
36
-
37
-
38
-
39
-
40
-
41
-
42
-
43
-
44
-
45
-
46
-
47
-
48
-
49
-
50
-
51
-
52
-
53
-
54
-
55
-
56
-
57
-
58
-
59
-
60
-
61
-
62
-
63
-
64
-
65
-
66
-
67
-
68
-
69
-
70
-
71
-
72
-
73
 |
 |
