Kenmore SI3209ZA Use and Care Guide - Page 19
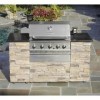
Burner Control, Knobs on Control Panel
 |
View all Kenmore SI3209ZA manuals
Add to My Manuals
Save this manual to your list of manuals |
Page 19 highlights
Grill Lighting Instructions 1. Before each use, check all hoses for cracks, nicks, cuts, burns or abrasions. If a hose is damaged in any way, do not use your grill before replacing the hose with an authorized part from the Parts List. Also make sure all gas supply connections are securely tightened. 2. Familiarize yourself with the safety and Use and Care instructions in this guide. Do not smoke while lighting grill or checking gas supply connections. 3. Be sure the LP Gas tank is filled. 4. Open the Grill Lid. Failure to replace a faulty hose, secure gas supply connections or to open the Lid before proceeding to the Lighting Procedures could result in a fire or explosion that could cause serious bodily injury, death, or property damage. 5. Set Control Knobs to OFF and open the LP Gas tank valve SLOWLY 1/4 of a turn. Rotisserie Burner Lighting Instructions 1. Follow steps 1 through 5 of the Grill Lighting Instructions. 2. Push and turn Burner Control Knob to _€ and hold knob in. 3. Keep pressing while you turn knob to Hi and hold in 5 - 10 seconds before releasing. 4. If ignition does not occur in 5 seconds, turn gas off at source and turn Control Knobs OFF. Wait at least 5 minutes for gas to clear, then retry. If your grill still fails to light turn the Control Knob(s) and gas source OFF and conduct a leak test as explained in the LP Gas Tank Installation of this guide. If no leaks are detected, wait 5 minutes for any gas to clear and repeat the lighting procedure. 5. After Burner is lit, turn the tank valve SLOWLY one more 1/4. IMPORTANT: Do not use the Rotisserie Burner and Main Burners at the same time. Rotisserie burner is for Rotis- serie Cooking only. ROTISSERIE BURNER KNOB: ! INFRAREDBURNER GRIDDLE BURNER KNOB: KNOB: ! m open LP Gas tank Hi OFF \\\ 6. Push and turn Burner Control Knob to _r and you will hear a clicking sound as the burner is being ignited. Once the burner is lit, turn the knob back to Hi. I Low i i OFF 7. If ignition does not occur in 5 seconds, turn gas off at source and turn Control Knobs OFF. Wait at least 5 minutes for gas to clear, then retry. If your grill still fails to light turn the burner Control Knob(s) and gas source OFF and conduct a leak test of ALL gas connections and gas sources as explained in the LP Gas Tank Installation of this guide. If no leaks are detected, wait 5 minutes for any gas to clear and repeat the lighting procedure. 8. After one Burner is lit, turn the tank valve SLOWLY one more 1/4 of a turn. 9. Turn Knob for each other burner and light as you move toward the fuel source. Burner Control Knobs on Control Panel Grill Main Burner Rotisserie Infrared Burner Burner 19 OFF OFF OFF Infrared Burner Lighting Instructions 1. Follow steps 1 through 5 of the Grill Lighting Instructions. 2. Push and turn Burner Control Knob to _€and hold knob in. 3. Keep pressing while you turn knob to Hi and hold in 5 - 10 seconds before releasing. 4. If ignition does not occur in 5 seconds, turn gas off at source and turn Control Knobs OFF. Wait at least 5 minutes for gas to clear, then retry. If your grill still fails to light turn the Control Knob(s) and gas source OFF and conduct a leak test as explained in the LP Gas Tank Installation of this guide. If no leaks are detected, wait 5 minutes for any gas to clear and repeat the lighting procedure. 5. After Burner is lit, turn the tank valve SLOWLY one more 1/4 of a turn. Griddle Burner Lighting Instructions 1. Follow steps 1 through 3 of the Grill Lighting Instructions. 2. Open the Griddle Side Burner Lid. 3. Set Control Knobs to OFF and open the LP Gas tank valve SLOWLY 1/4 of a turn. 4. Push and turn Burner Control Knob to _ and you will hear a clicking sound as the burner is being ignited. Once the burner is lit, tum the knob back to Hi. 5. If ignition does not occur in 5 seconds, turn gas off at source and turn Control Knobs OFF. Wait at least 5 minutes for gas to clear, then retry. If your grill still fails to light turn the Control Knob(s) and gas source OFF and conduct a leak test as explained in the LP Gas Tank Installation of this guide. If no leaks are detected, wait 5 minutes for any gas to clear and repeat the lighting procedure. 6. After Burner is lit, turn the tank valve SLOWLY one more 1/4 of a turn.
-
 1
1 -
2
-
3
-
4
-
5
-
6
-
7
-
8
-
9
-
10
-
11
-
12
-
13
-
 14
14 -
 15
15 -
 16
16 -
 17
17 -
 18
18 -
 19
19 -
 20
20 -
 21
21 -
 22
22 -
 23
23 -
 24
24 -
25
-
26
-
27
-
28
-
29
-
30
-
31
-
32
-
33
-
34
-
35
-
36
-
37
-
38
-
39
-
40
-
41
-
42
-
43
-
44
-
45
-
46
-
47
-
48
-
49
-
50
-
51
-
52
-
53
-
54
-
55
-
56
-
57
-
58
-
59
-
60
-
61
-
62
-
63
-
64
-
65
-
66
-
67
-
68
-
69
-
70
-
71
-
72
-
73
 |
 |
