Kenwood CD-4900M User Manual - Page 28
Registration of DTS discs
 |
View all Kenwood CD-4900M manuals
Add to My Manuals
Save this manual to your list of manuals |
Page 28 highlights
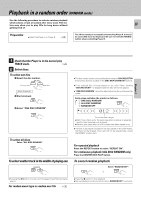
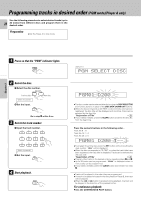
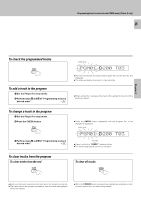
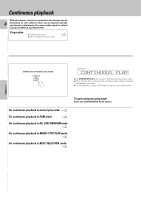
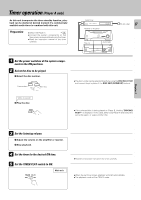
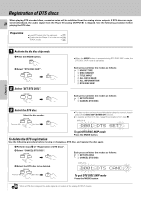
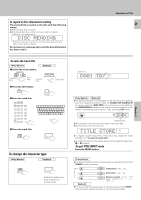
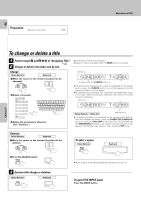
Registration of DTS discs When playing DTS-encoded discs, excessive noise will be exhibited from the analog stereo outputs. If DTS discs are regis- 28 tered beforehand, the audio signal from the Player B (analog OUTPUT-B) is skipped. Use the following procedure before playing the DTS disc. Preparation ÷ Load DTS discs into the carousel. & ÷ Check that the Player A is in the normal play TRACK mode. ) Chapter 1 Chapter 2 Chapter 3 Chapter 4 1 Activate the dts disc skip mode. 1 Press the MODE button. MODE 2 Select "DTS DISC SKIP". DISC SKIP DOWN UP SET \ 2 Select "SET DTS DISC". DISC SKIP DOWN UP SET \ ÷ When the MODE button is pressed during DTS DISC SKIP mode, the DTS DISC SKIP mode is cancelled. Each press switches the modes as follows: 1 MUSIC TYPE 2 DISC SEARCH 3 TITLE INPUT 4 ALL DATA READ 5 ALL INFORMATION 6 DTS DISC SKIP Each press switches the modes as follows: 1 SET DTS DISC 2 CANCEL DTS DISC 3 Select the DTS disc. Select the disc number. DISC SKIP DOWN UP SET Previous disc \ Next disc ÷ The disc number can be selected directly by using the numeric keys in place of the DISC SKIP (DOWN/UP) buttons. ÷ To register another DTS disc, repeat the procedure from step 3. DISPLAY-A D001IDTSUSET?AY To quit DTS DISC SKIP mode Press the MODE button. To delete the DTS registration Use the following procedure before moving or changing a DTS disc, and register the disc again. 1 Perform steps 1 of "Registration of DTS discs". 2 Select "CANCEL DTS DISC". DISC SKIP DOWN UP SET \ Each press switches the modes as follows: 1 SET DTS DISC 2 CANCEL DTS DISC 3 Select the DTS disc to be deleted. DISC SKIP DOWN UP Previous disc SET \ Next disc DISPLAY-A D001IDTSUCANC.? To quit DTS DISC SKIP mode Press the MODE button. When a DTS disc is played, the audio signal is not output at the analog OUTPUT A jacks. Note Chapter 5 Chapter 6 Chapter 7
-
 1
1 -
2
-
3
-
4
-
5
-
6
-
7
-
8
-
9
-
10
-
11
-
12
-
13
-
14
-
15
-
16
-
17
-
18
-
19
-
20
-
21
-
22
-
 23
23 -
 24
24 -
 25
25 -
 26
26 -
 27
27 -
 28
28 -
 29
29 -
 30
30 -
 31
31 -
 32
32 -
 33
33 -
34
-
35
-
36
-
37
-
38
-
39
-
40
-
41
-
42
-
43
-
44
 |
 |
