Kenwood DDX8036BT User Manual 1 - Page 76
Screen Control, Registering Bluetooth Unit
 |
View all Kenwood DDX8036BT manuals
Add to My Manuals
Save this manual to your list of manuals |
Page 76 highlights
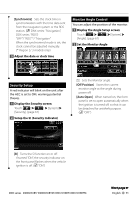
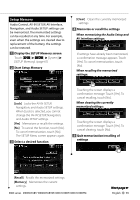
Setup Menu 3 Select a Preset number to register 2 sec. Adjusted color is registered to the selected Preset button. 4 Complete the color coordination Screen Control You can adjust the screen mode of the monitor. 1 Display the Screen Control screen Touch [ ] > [ ] > [Display] > [Screen Control]. (page 67) 2 Set each item control switch is turned On or Off. "NAV-SYNC": Turning the Dimmer function On or Off according to the Navigation Day/Night display setting. (DNX series and DDX series with navigation unit only) ⁄ • In this Screen Control screen, you can perform setups for the menu screen. Setups for videos such as DVD can be performed on the (page 48). Registering Bluetooth Unit Registers the Bluetooth unit to be connected. 1 Display the Bluetooth Setup screen Touch [ ] > [ ] > [Bluetooth SETUP]. (page 67) 2 Display the Connect Device List screen [Bright] Brightness Control [Contrast] Contrast Control [Black] Black Level Adjustment [Dimmer] Dimmer Mode Setup ( "ON") "ON": The display dims. "OFF": The display doesn't dim. "SYNC": Turning the Dimmer function On or Off when the vehicle light 76 DNX series DNX7360BT/ DNX7360BTM 3 Search for a Bluetooth unit 1 1 Displays the registered Bluetooth units. [ ] When appears, the text display is scrolled by touching it.
-
 1
1 -
2
-
3
-
4
-
5
-
6
-
7
-
8
-
9
-
10
-
11
-
12
-
13
-
14
-
15
-
16
-
17
-
18
-
19
-
20
-
21
-
22
-
23
-
24
-
25
-
26
-
27
-
28
-
29
-
30
-
31
-
32
-
33
-
34
-
35
-
36
-
37
-
38
-
39
-
40
-
41
-
42
-
43
-
44
-
45
-
46
-
47
-
48
-
49
-
50
-
51
-
52
-
53
-
54
-
55
-
56
-
57
-
58
-
59
-
60
-
61
-
62
-
63
-
64
-
65
-
66
-
67
-
68
-
69
-
70
-
 71
71 -
 72
72 -
 73
73 -
 74
74 -
 75
75 -
 76
76 -
 77
77 -
 78
78 -
 79
79 -
 80
80 -
 81
81 -
82
-
83
-
84
-
85
-
86
-
87
-
88
-
89
-
90
-
91
-
92
-
93
-
94
-
95
-
96
-
97
-
98
-
99
-
100
-
101
-
102
-
103
-
104
-
105
-
106
-
107
-
108
-
109
-
110
-
111
-
112
 |
 |
