Kenwood DNX531VBT User Manual - Page 5
DNX4310DAB, How To Insert A MicroSD Card, To eject the card
 |
View all Kenwood DNX531VBT manuals
Add to My Manuals
Save this manual to your list of manuals |
Page 5 highlights
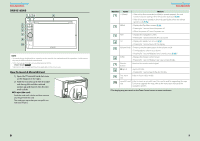
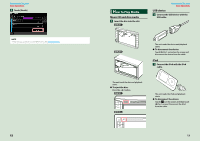
Return to the Top page Basic Operations DNX4310DAB 178 9 2 3 4 5 6 10 NOTE • The panels shown in this guide are examples used to provide clear explanations of the operations. For this reason, they may be different from the actual panels. • In this manual, each model name is abbreviated as follows. DNX4310DAB : If above icons are showed, read the article applicable to the unit you use. How To Insert A MicroSD Card 1) Open the 10 microSD card slot cover as the diagram in the right. 2) Hold the microSD card with the label side facing left and the notched section up and insert it into the slot until it clicks. ● To eject the card: Push the card until it clicks and then remove your finger from the card. The card pops up so that you can pull it out with your fingers. Return to the Top page Basic Operations Number Name 1 fi (Reset) Motion • If the unit or the connected unit fails to operate properly, the unit returns to factory settings when this button is pressed (P.95). • If the SI function is turned on, this indicator flashes when the vehicle ignition is off (P.74). 2 MENU • Displays the Top Menu screen (P.16). • Pressing for 1 second turns the power off. • When the power off, turns the power on. 3 NAV • Displays the navigation screen. • Pressing for 1 second switches AV out sources. 4 TEL • Displays the Hands Free screen (P.58). • Pressing for 1 second turns off the display. 5 Volume Knob • Pressing switches attenuation of the volume on/off. • Turning adjusts volume up or down. • Pressing for 1 second displays Tone Control screen (P.85).* 6 SCRN • Displays the Screen Control screen. • Pressing for 1 second displays rear view camera display. 7 Remote Sensor Receives the remote control signal. 8 0 (Eject) • Ejects the disc. • Pressing for 1 second ejects the disc forcibly. 9 Disc insert slot A slot to insert a disc media. 10 microSD card A slot to insert an microSD card. The card is used for upgrading the map. slot For how to upgrade the map, refer to the instruction manual of the navigation system. * The display may not switch to the Tone Control screen in some conditions. 8 9
-
 1
1 -
 2
2 -
 3
3 -
 4
4 -
 5
5 -
 6
6 -
 7
7 -
 8
8 -
 9
9 -
 10
10 -
 11
11 -
12
-
13
-
14
-
15
-
16
-
17
-
18
-
19
-
20
-
21
-
22
-
23
-
24
-
25
-
26
-
27
-
28
-
29
-
30
-
31
-
32
-
33
-
34
-
35
-
36
-
37
-
38
-
39
-
40
-
41
-
42
-
43
-
44
-
45
-
46
-
47
-
48
-
49
-
50
-
51
-
52
-
53
-
54
-
55
 |
 |
