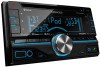
Kenwood DPX500BT Quick Start Guide - Page 10
Installation the Unit
 |
View all Kenwood DPX500BT manuals
Add to My Manuals
Save this manual to your list of manuals |
Page 10 highlights
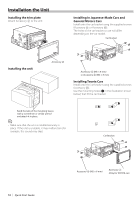
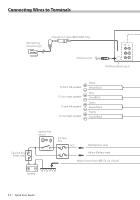
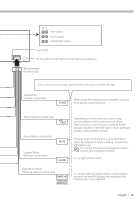
Installation the Unit Installing the trim plate Attach Accessory 2 to the unit. Installing in Japanese-Made Cars and General Motors Cars Install onto the car bracket using the supplied screws (Accessory 5 or Accessory 6). The holes of the car bracket to use will differ depending on the car model. Car Bracket Installing the unit Accessory 2 Accessory 5 (M5 × 8 mm) or Accessory 6 (M5 × 8 mm) Installing Toyota Cars Install onto the car bracket using the supplied screws (Accessory 6). Use the mounting holes (¦ in the illustration shown below) that fit the car bracket. Bend the tabs of the mounting sleeve with a screwdriver or similar utensil and attach it in place. ⁄ • Make sure that the unit is installed securely in place. If the unit is unstable, it may malfunction (for example, the sound may skip). Car Bracket 10 | Quick Start Guide Accessory 6 (M5 × 8 mm) Accessory 3 (Only for TOYOTA car)
-
 1
1 -
2
-
3
-
4
-
 5
5 -
 6
6 -
 7
7 -
 8
8 -
 9
9 -
 10
10 -
 11
11 -
 12
12 -
 13
13 -
 14
14 -
 15
15 -
16
-
17
-
18
-
19
-
20
-
21
-
22
-
23
-
24
-
25
-
26
-
27
-
28
-
29
-
30
-
31
-
32
-
33
-
34
-
35
-
36
-
37
-
38
-
39
-
40
-
41
-
42
-
43
-
44
-
45
-
46
-
47
-
48
 |
 |
