Kenwood KDC-X879 Instruction Manual - Page 15
Display Mode Switching, Side Graphic Display Switching, Press the [3] DISP KDC-MP925/X879/ [4]
 |
View all Kenwood KDC-X879 manuals
Add to My Manuals
Save this manual to your list of manuals |
Page 15 highlights
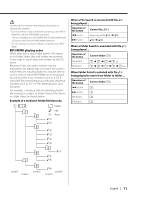
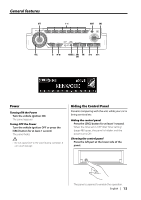
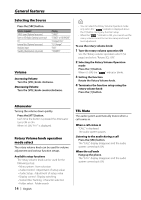
Display Mode Switching Switching the display mode. 1 Select the key function section Press the [NEXT] button. Repeatedly press the button until "DISP" is displayed above the [3] (KDC-MP925/X879)/ [4] (KDC-X979) button. Refer to 'Notes on Multi-function Key System' (page 9). 2 Enter display control mode Press the [3] ("DISP") (KDC-MP925/X879)/ [4] ("DISP") (KDC-X979) button. 3 Select the display mode Press the [2] ("MODE") button. Each time the button is pressed the display mode switches as shown below. Display Mode Display "Display:A" 1 2 1 3 4 "Display:B" 6 5 4 "Display:C" 6 5 "Display:D" 6 1 Side graphic part 2 Upper text display part 3 Lower text display part 4 Function item display 5 Text display part 6 Graphic & spectrum analyzer display part 4 Exit display control mode Press the [6] ("RTN") button. ... ... • When the 'Dual Zone System' (page 25) is ON, the spectrum analyzer cannot be displayed. • The display is dimmed during "Display:B" or "Display: C" mode. • The indicator appears only when the Clock is displayed in the upper or lower position during "Display:A" mode. Display:A Side Graphic Display Switching Switching the Side graphic Display. 1 Select the key function section Press the [NEXT] button. Repeatedly press the button until "DISP" is displayed above the [3]/ [4] button. Refer to 'Notes on Multi-function Key System' (page 9). 2 Enter display control mode Press the [3]/ [4] ("DISP") button. 3 Select the display mode Press the [2] ("MODE") button. Select the "Display:A" display. 4 Enter display control mode Press the [4] ("SIDE") button. "Side Graphic" is displayed. 5 Select the side graphic display Press the [4] or [¢] button. Each time the button is pressed the side graphic display switches as shown below. Side graphic display Text + Source Graphic 1 Graphic 3 Spectrum analyzer 1 Spectrum analyzer 4 Blank 6 Exit display control mode Press the [6] ("RTN") button. • No function item is displayed if "Display:C" or "Display: D" is selected. To use a function item, press any of [1] to [6] buttons or [NEXT] button. The function item will be displayed approximately 5 seconds. • The setting of this function is available while "Display : A" is selected for the Display mode. English | 15
-
 1
1 -
2
-
3
-
4
-
5
-
6
-
7
-
8
-
9
-
 10
10 -
 11
11 -
 12
12 -
 13
13 -
 14
14 -
 15
15 -
 16
16 -
 17
17 -
 18
18 -
 19
19 -
 20
20 -
21
-
22
-
23
-
24
-
25
-
26
-
27
-
28
-
29
-
30
-
31
-
32
-
33
-
34
-
35
-
36
-
37
-
38
-
39
-
40
-
41
-
42
-
43
-
44
-
45
-
46
-
47
-
48
-
49
-
50
-
51
-
52
-
53
-
54
-
55
-
56
-
57
-
58
-
59
-
60
-
61
-
62
-
63
-
64
 |
 |
