Kenwood KTC-H2A1 Instruction Manual - Page 13
Setup Mode - sirius
 |
UPC - 019048148148
View all Kenwood KTC-H2A1 manuals
Add to My Manuals
Save this manual to your list of manuals |
Page 13 highlights
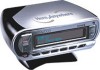
Press the DISPLAY button to cycle the display between the two modes. Adjusting the display brightness Hold the DISPLAY button down for over 1 second to enter the Display Brightness mode (right): 1. Use the up & down arrow buttons to select the desired brightness level (high/medium/low) 2. Press the SELECT button to save your selection Display Brightness Screen • Press the DISPLAY button to exit this mode Setup Mode The Setup Mode lets you access and set up the following features: SID (SIRIUS ID Number), Auto Clock Setup, Alarm Clock Setup, Channel Skip/Lock, Lock Code Setup, Auto Shutoff Setup, Startup Mode, Output Level, Text Flow Type, Audible Alert, and Antenna Signal. To enter the Setup Mode, hold the POWER button on the front panel for at least 1 second. Use the left & right arrow buttons to move to the setup feature you want, and press the SELECT button to select the feature. To exit the Setup Mode and return to the previous operation mode, press the POWER button at any time while the Setup Mode is active. SID When you first enter the Setup Mode, the unit's unique 12-digit SIRIUS ID Number will be displayed (right): SIRIUS ID Screen 24 Here2Anywhere Instruction Manual (ver. 2) Clock Setup Here2Anywhere has an automatic clock that receives its time signal as part of the SIRIUS satellite stream. To set the clock, you need to tell Here2Anywhere what time zone you live in and if your local area observes Daylight Savings Time. Auto Clock Setup Screen 1. While in the Setup Mode, press the left or right arrow buttons until the Auto Clock Setup screen appears (top, right). 2. Press the up or down button once and the Time Zone Setup screen appears (middle, right). 3. Press the up or down arrow buttons until your time zone is highlighted, then press the SELECT button. Time Zone Setup Screen • The screen will change to the Daylight Savings screen (bottom, right). 3. If your local area observes Daylight Savings Time, press the SELECT button so an "X" appears in the box on the display's fourth line; if your local area does not observe Daylight Savings Time, press the SELECT button so that the box is empty. Note: If you drive into another time zone (or into an area with a different Daylight Savings Time status than your local area) you will have to re-set the clock. Daylight Savings Screen Here2Anywhere Instruction Manual (ver. 2) 25
-
 1
1 -
2
-
3
-
4
-
5
-
6
-
7
-
 8
8 -
 9
9 -
 10
10 -
 11
11 -
 12
12 -
 13
13 -
 14
14 -
 15
15 -
 16
16 -
 17
17 -
 18
18 -
19
 |
 |
