Kenwood KTC-HR300 Instruction Manual - Page 9
Receive mode
 |
UPC - 019048183231
View all Kenwood KTC-HR300 manuals
Add to My Manuals
Save this manual to your list of manuals |
Page 9 highlights
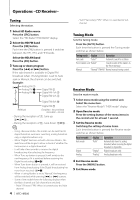
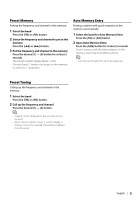
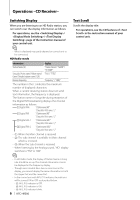
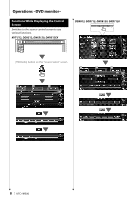
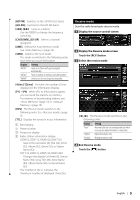
[HD FM] Switches to the HD FM1/2/3 band. [HD AM] Switches to the HD AM band. [4], [¢] Tunes in a station. Use the [SEEK] to change the frequency switching. [CH DOWN], [CH UP] Selects a channel (program). [AME] Selects the Auto Memory mode. See (page 10). [SEEK] Switches the Seek mode. The mode is switched in the following order each time you touch the button. Display Setting "AUTO1" Tunes in a station with good reception automatically. "AUTO2" Tunes in stations in memory one after another. "MANU" Switches to the next frequency manually. [4Line]/ [2Line] Switches the number of lines displayed in the Information Display. [P1] - [P6] When [P1] to [P6] buttons appear, you can recall the stations on memory. For memory of broadcasting stations, see (page 10) or (page 10). [RCV] The Receive mode switches in the following order. See (page 9). [TTL] Displays the tuned in music information. 1 Band display 2 Preset number 3 Frequency display 4 Radio station information display. DDX812, DDX712, DNX8120, DNX7120 Selects the Call Letter (8), Title (32), Artist (32), Album (32), Genre (32), or Station Name (32). KVT-512, DDX512, DNX5120, DNX512EX Changes the display Call letter (8), Station Name (94), Song Title (80), Artist Name (80), Album Name (80), to Genre Name (32). The number in the ( ) indicates the maximum number of displayed characters. Receive mode Sets the radio broadcasts receive mode. 1 Display the source control screen 2 Display the Receive mode screen Touch the [RCV] button. 3 Select the receive mode [2], [3] The Receive mode switches in the following order. Display "Auto" "Digital" "Analog" Setting Automatically tunes to analog broadcast when receiving the digital broadcast is impossible. Digital broadcasts only. Analog broadcasts only. 4 Exit Receive mode Touch the [ ] button. English | 9
-
 1
1 -
2
-
3
-
 4
4 -
 5
5 -
 6
6 -
 7
7 -
 8
8 -
 9
9 -
 10
10 -
 11
11 -
 12
12 -
 13
13 -
 14
14
 |
 |