Kenwood TH-D74A User Manual - Page 7
Battery Life, Connecting To A Cigarette Lighter Socket, Connecting To A Regulated Power Supply
 |
View all Kenwood TH-D74A manuals
Add to My Manuals
Save this manual to your list of manuals |
Page 7 highlights
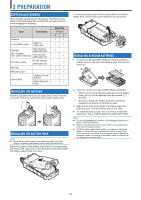
For charging the battery pack with the optional rapid battery charger Note: ◆◆ Insert the battery pack only in the rapid battery charger to charge a battery pack that has been in storage for a long time. ◆◆ If the battery pack is completely depleted while using the transceiver, remove the battery pack from the transceiver and insert the battery pack in the rapid battery charger. Charger Error • While charging, if a problem is detected in the battery, "Charge Error !!" appears on the display. • The following conditions create charging errors: • A short in the battery is detected. • Overvoltage in the battery is detected. • When a charge error occurs, no key other than [ ] will function. BATTERY LIFE Before you operate the transceiver outside using a battery pack, it is important to know how long the battery pack will last. The operating times listed in the table below are measured under the following cyclic conditions: TX: 6 seconds, RX: 6 seconds, Stand-by: 48 seconds We recommend you carry extra battery packs with you, in case the battery pack becomes depleted. Battery Type KNB-75L Li-ion battery pack KNB-74L Li-ion battery pack KBP-9 Battery case Output Power H M L EL H M L EL H M L EL Operating Time/ Hours (Approx.) 6 8 12 15 4 5 7 9 3.5 - DC-DC Converter 24V 12V PG-3J Socket 24V 12V PG-3J DC-DC Converter 24V 12V PG-2W Note: ◆◆ Do not use the PG-2W to connect directly to a vehicle battery (12 V). Extensive voltage could result in damaging the transceiver. ◆◆ If the input voltage exceeds approximately 17.5 V, the transceiver automatically turns OFF. CONNECTING TO A REGULATED POWER SUPPLY To connect the transceiver to an appropriate regulated DC power supply, use an optional PG-2W DC cable. 1 Confirm that the power of both the transceiver and the DC power supply is OFF. 2 Connect the optional PG-2W DC cable to the DC power supply; the red lead to the positive (+) terminal, and the black lead to the negative (-) terminal. Fuses (3 A) 3 Connect the barrel plug on the DC cable to the DC IN jack of the transceiver. • While a DC power supply is connected with the DC IN jack, the transceiver automatically initiates charging the battery pack. Note: ◆◆ The supply voltage must be between 12.0 V and 16.0 V to prevent damaging the transceiver. If the input voltage exceeds approximately 17.5 V, the transceiver automatically turns OFF. CONNECTING TO A CIGARETTE LIGHTER SOCKET To connect the transceiver to the cigarette lighter socket in your vehicle, use an optional PG-3J Cigarette Lighter cable. When the PG-3J is connected to the cigarette lighter plug, the transceiver automatically starts charging the battery pack. While you operate the transceiver, it charges the battery pack in the background. Note: ◆◆ To connect with an external 24 V power source via a DC-DC converter, only use the optional PG-3J Cigarette Lighter cable. ◆◆ Using the PG-2W DC cable in this situation may cause a fire. 3-3
-
 1
1 -
 2
2 -
 3
3 -
 4
4 -
 5
5 -
 6
6 -
 7
7 -
 8
8 -
 9
9 -
 10
10 -
 11
11 -
 12
12 -
13
-
14
-
15
-
16
-
17
-
18
-
19
-
20
-
21
-
22
-
23
-
24
-
25
-
26
-
27
-
28
-
29
-
30
-
31
-
32
-
33
-
34
-
35
-
36
-
37
-
38
-
39
-
40
-
41
-
42
-
43
-
44
-
45
-
46
-
47
-
48
-
49
-
50
-
51
-
52
-
53
-
54
-
55
-
56
-
57
-
58
-
59
-
60
-
61
-
62
-
63
-
64
-
65
-
66
-
67
-
68
-
69
-
70
-
71
-
72
-
73
-
74
-
75
-
76
-
77
-
78
-
79
-
80
-
81
-
82
-
83
-
84
-
85
-
86
-
87
-
88
-
89
-
90
-
91
-
92
-
93
-
94
-
95
-
96
-
97
-
98
-
99
-
100
-
101
-
102
-
103
-
104
-
105
-
106
-
107
-
108
-
109
-
110
-
111
-
112
-
113
-
114
-
115
-
116
-
117
-
118
-
119
-
120
-
121
-
122
-
123
-
124
-
125
-
126
-
127
-
128
-
129
 |
 |
