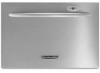
KitchenAid KUDD01SSSS Installation Instructions - Page 9
Option 2: Install custom door panel - 23
 |
View all KitchenAid KUDD01SSSS manuals
Add to My Manuals
Save this manual to your list of manuals |
Page 9 highlights
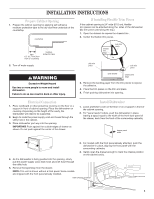
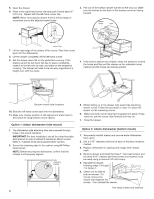
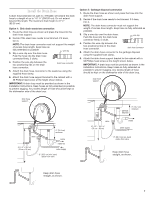
Option 2: Install custom door panel Custom door panel dimensions 9" (22.9 cm) 2 5.9 cm) medallion location area (front view) 15 39.7 cm) 5" (12.7 cm) 6. Measure and mark the vertical centerline and horizontal position line on the back of the custom door panel. 1 36.5 mm) mark horizontal line mark centerline 7. Mount the handle to the custom door panel. The screws must not extend beyond the back surface of the panel. Countersink the holes. 8. Feed the wires of the medallion connector through the front of the custom door panel and push the medallion into the prepared medallion hole. 23 59.5 cm) 1 30.8 mm) 1 32.6 mm) max. end may be round or squared off ¹⁄₄" (6.4 mm) NOTE: Do not cut beyond outline of medallion cutout. 2 60.8 mm) 1 30.6 mm) Medallion cutout dimensions Rout a ¹⁄₄" (6.4 mm) radius around the back side of the medallion cutout. It is not necessary to rout the ¹⁄₄" (6.4 mm) radius on the right hand tip of the medallion cutout. (front of panel) Minimum panel thickness is 16 mm). Panel thickness more than 18 mm) can be accommodated but overall product depth will increase accordingly. Custom door panel material must be suitable for damp conditions or adequately sealed to withstand moisture and humidity. Using a moisture-resistant material can provide additional protection. Taping edges alone may not provide adequate sealing. For painted panel, paint all rear edges to improve sealing. 1. Cut the custom door panel to specifications shown. The custom panel may be wider than the dishwasher in order to match the surrounding cabinets. 2. On the front side of the custom door panel, measure and mark the location of the customer supplied handle. The location is customer preference. Do not install handle at this time. 3. On the front side of the custom door panel, measure, mark and cut a hole for the medallion per specifications shown. NOTE: The medallion must be placed within the specified medallion area. Do not locate outside of this specified area. 4. Lay the custom front panel face down on a protective covering to prevent damage or abrasions. 5. On the back side of the custom door panel, rout a ¹⁄₄" (6.4 mm) radius around the medallion cutout. The medallion end does not need to be routed. 9. Remove the pins on both sides of the dishwasher drawer by pulling the pins straight out with a pair of needle-nose pliers. pin 10. Gently pull the bottom of the metal plate away from the dishwasher, and then pull down. 11. Lay the custom door panel face down. 12. Feed the medallion wires through the wire opening in the metal plate. wire opening metal plate door panel 13. Lay the metal plate on the back of the custom door panel. 9
-
 1
1 -
2
-
3
-
 4
4 -
 5
5 -
 6
6 -
 7
7 -
 8
8 -
 9
9 -
 10
10 -
 11
11 -
 12
12 -
 13
13 -
 14
14 -
15
-
16
-
17
-
18
-
19
-
20
 |
 |
