Konica Minolta AccurioPress C6100 IC-314 User Guide - Page 237
Folded Signature, Preview, Paper size, Print, Trim size, Trim size from file, Reduce trim, From file
 |
View all Konica Minolta AccurioPress C6100 manuals
Add to My Manuals
Save this manual to your list of manuals |
Page 237 highlights
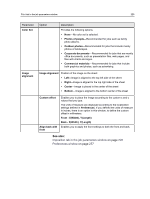
Imposition tab in the job parameters window 227 Parameter Size Option Preview Paper size Trim size Reduce trim size Trim orientation Description stitching, pages are grouped together and stapled or stitched across a common center fold. The saddle groups are then stacked one on top of another and glued, as with perfect binding. ● Folded Signature-A technique in which a large sheet is folded several times to form a section of a book, a magazine, or a pamphlet. Enables you to view either a thumbnail view or a layout view of your imposition layout and settings. You can open the Preview window at any time and keep it open to check your imposition settings as you select them. The Preview window dynamically reflects any changes that you make. The available paper sizes. For custom paper sizes, you need to specify the required width and height. Note: This field inherits its value from the Paper size defined in the Print tab. If you change the paper size in this tab it also changes the paper size in the Print tab. The size of the finished, trimmed document. For custom trim sizes, you must specify a width and height. Tip: If you set the trim size smaller than the page size set in the DTP application, the data will be cropped. Setting a larger trim size results in a larger border on the printed page. ● Trim size from file-Uses the trim size from the file's original page size. Note: When this option is selected, fixed or custom trim sizes cannot be set. This option helps to support an automated workflow via a virtual printer, in which both trim and bleed sizes can be used. The option is available only when the From file option is selected in the Trim size list. The value set in this box affects both axes-height and width, and sums the amount of reduction in both sides of the trim area on each axis. For example, setting 0.4 mm in the box will reduce the trim size 0.2 mm from left, 0.2 mm from right, 0.2 mm from the top, and 0.2 mm from the bottom. If crop marks were set, they will be positioned according to the new trim size (after the reduction). Note: It is possible to enter positive and negative numbers. A positive number will reduce the trim size. A negative number will increase it. Displays the orientation, portrait or landscape, for the selected trim size. If the wrong orientation is selected, the job might be cropped as a result.
-
 1
1 -
2
-
3
-
4
-
5
-
6
-
7
-
8
-
9
-
10
-
11
-
12
-
13
-
14
-
15
-
16
-
17
-
18
-
19
-
20
-
21
-
22
-
23
-
24
-
25
-
26
-
27
-
28
-
29
-
30
-
31
-
32
-
33
-
34
-
35
-
36
-
37
-
38
-
39
-
40
-
41
-
42
-
43
-
44
-
45
-
46
-
47
-
48
-
49
-
50
-
51
-
52
-
53
-
54
-
55
-
56
-
57
-
58
-
59
-
60
-
61
-
62
-
63
-
64
-
65
-
66
-
67
-
68
-
69
-
70
-
71
-
72
-
73
-
74
-
75
-
76
-
77
-
78
-
79
-
80
-
81
-
82
-
83
-
84
-
85
-
86
-
87
-
88
-
89
-
90
-
91
-
92
-
93
-
94
-
95
-
96
-
97
-
98
-
99
-
100
-
101
-
102
-
103
-
104
-
105
-
106
-
107
-
108
-
109
-
110
-
111
-
112
-
113
-
114
-
115
-
116
-
117
-
118
-
119
-
120
-
121
-
122
-
123
-
124
-
125
-
126
-
127
-
128
-
129
-
130
-
131
-
132
-
133
-
134
-
135
-
136
-
137
-
138
-
139
-
140
-
141
-
142
-
143
-
144
-
145
-
146
-
147
-
148
-
149
-
150
-
151
-
152
-
153
-
154
-
155
-
156
-
157
-
158
-
159
-
160
-
161
-
162
-
163
-
164
-
165
-
166
-
167
-
168
-
169
-
170
-
171
-
172
-
173
-
174
-
175
-
176
-
177
-
178
-
179
-
180
-
181
-
182
-
183
-
184
-
185
-
186
-
187
-
188
-
189
-
190
-
191
-
192
-
193
-
194
-
195
-
196
-
197
-
198
-
199
-
200
-
201
-
202
-
203
-
204
-
205
-
206
-
207
-
208
-
209
-
210
-
211
-
212
-
213
-
214
-
215
-
216
-
217
-
218
-
219
-
220
-
221
-
222
-
223
-
224
-
225
-
226
-
227
-
228
-
229
-
230
-
231
-
 232
232 -
 233
233 -
 234
234 -
 235
235 -
 236
236 -
 237
237 -
 238
238 -
 239
239 -
 240
240 -
 241
241 -
 242
242 -
243
-
244
-
245
-
246
-
247
-
248
-
249
-
250
-
251
-
252
-
253
-
254
-
255
-
256
-
257
-
258
-
259
-
260
-
261
-
262
-
263
-
264
-
265
-
266
-
267
-
268
-
269
-
270
-
271
-
272
-
273
-
274
-
275
-
276
-
277
-
278
-
279
-
280
-
281
-
282
-
283
-
284
-
285
-
286
-
287
-
288
-
289
-
290
-
291
-
292
-
293
-
294
-
295
-
296
-
297
-
298
-
299
-
300
-
301
-
302
-
303
-
304
-
305
 |
 |
